Difference between revisions of "Adding an MCP escort objective"
(Batch update) |
(→Worldspawn keys) |
||
| Line 68: | Line 68: | ||
== Worldspawn keys == | == Worldspawn keys == | ||
Worldspawn keys are required for the vehicle_route_constraint_controller and the vehicle_mcp_caller: | Worldspawn keys are required for the vehicle_route_constraint_controller and the vehicle_mcp_caller: | ||
| − | * {{keyname| | + | * {{keyname|script_mcp_caller}} {{keyvalue|vehicle_mcp_caller}} |
| − | * {{keyname| | + | * {{keyname|script_mcp_route}} {{keyvalue|mcp_route_constraint_controller}} |
== See Also == | == See Also == | ||
* [[Entity vehicle_mcp_caller|vehicle_mcp_caller]] | * [[Entity vehicle_mcp_caller|vehicle_mcp_caller]] | ||
* [[Entity vehicle_route_constraint_controller|vehicle_route_constraint_controller]] | * [[Entity vehicle_route_constraint_controller|vehicle_route_constraint_controller]] | ||
Latest revision as of 17:06, 2 January 2008
We are now ready to set up the second objective. In the example map, etqwmap.world, there is a basic linear MCP route. It is possible to have a fork in the route, giving players a choice in which way to escort the MCP to the outpost. Its pretty simple to do this, but for now we will just explain how to add a linear route. As mentioned in the Introduction and goals of the tutorial the map we are making will not be fully functional until the map script is finished. So wait until you have worked through each stage of the tutorial before trying to finish the objectives.
The MCP objective is fairly simple to set up. More time will probably be spent fine tuning the MCP mask, mentioned in Necessary masks and declarations. A functioning MCP objective requires the following components:
- The MCP itself, an vehicle_mcp_caller entity.
- A vehicle_route_constraint_controller which manages the objective
- The series of MCP markers used to guide the player to the outpost.
- An entity used to project a green "deploy spot" decal onto the outpost.
Contents
The MCP caller
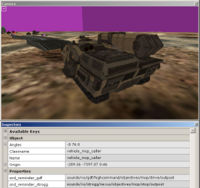
When you are happy with a location for an MCP objective to begin, place an vehicle_mcp_caller entity into your map. This is where the MCP will be dropped in once the bridge is built. The entity is displayed with an MCP model for easy orientation.
Required Keys
The following key pairs are used to give players voice over reminders about the MCP objective:
- snd_reminder_gdf sounds/vo/gdf/highcommand/objectives/mcp/drive/outpost
- Sound shader to remind GDF players about the objective.
- snd_reminder_strogg sounds/vo/strogg/nexus/objectives/mcp/stop/outpost
- Sound shader to remind Strogg players about the objective.
Route constraint controller
This entity is used to manage the objective. One is required per MCP route. To add one place an vehicle_route_constraint_controller to your map. Its location is not important, but for neatness just place it near the MCP caller. Call it mcp_route_constraint_controller - you will need to use the name next.
MCP Route markers
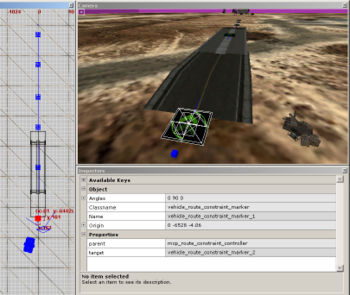
These are the green markers the MCP driver sees in game. These are a chain of vehicle_route_constraint_marker entities. The first one targets the second. The second targets the third and so forth. You can target them by selecting two and hitting CtrlK. This will target the first that was selected to the second.
Guidelines and Required keys
- parent mcp_route_constraint_controller
- The name of the vehicle_route_constraint_controller we made beforehand.
- target vehicle_route_constraint_marker_2
- The name of the next marker in the chain. This will be created upon using the target entity command (CtrlK)
- no_air_drop 0
- Defaults to 0. Making a marker no_airdrop = 1 will mean that if a new MCP is brought in, it will not be dropped here. The game will drop the MCP at the last marker that the MCP reached without this key set 1. This is used for the markers inside the Valley tunnel since an MCP cannot be dropped there.
- There is no to limit to the amount of MCP markers, just be sure to place enough so that one is always visible to the driver.
- There should be no loops in the markers. For example, a marker should not target one further back in the chain.
- You don't need to rotate markers so that they point the next in the chain. The game will orientate them for you.
MCP Deploy marker
The spot where the MCP should be deployed is defined by a misc_mcp_marker entity. This should be placed flush with the terrain and will project a pretty green decal, showing the the driver where to deploy. The location should match the valid deploy area in the MCP mask
Required keys
The following key pairs are used:
- decal_size 1024 1024 64
- The size of the projected decal.
- team gdf
- Team which the deploy marker will show for.
- mtr_deploy textures/decals/mcp_deployzone_valley
- Deploy marker material.
Worldspawn keys
Worldspawn keys are required for the vehicle_route_constraint_controller and the vehicle_mcp_caller:
- script_mcp_caller vehicle_mcp_caller
- script_mcp_route mcp_route_constraint_controller

