Atmosphere Editor
The Atmosphere & Weather Editor (editAtmos) encapsulates a variety of tools and controls, with which the user can design and tweak the look and feel of the outside game world. This ranges from light setup and skybox texturing to wind and precipitation effects such as rain and snow.
Contents
Overview
The Atmosphere & Weather Editor can be started from the console with the editAtmos command. The atmosphere data is stored as .atm files in the folder base/atmosphere.
Using The Atmosphere Editor
- You can create a new atmosphere by selecting File -> New or pressing the
 icon.
icon. - Alternately, you can edit any existing atmospheres by selecting one from the "Atmosphere" drop-down list at the top centre of the window.
- Once you have made changes to an atmosphere, you can save it by selecting File -> Save or pressing the
 icon.
icon. - If you want to save your changes as a different atmosphere name, select File -> Save As... or press the
 icon. Type a new atmosphere name into the field that pops up, then select a .atm file to store your atmosphere in.
 - If you want to revert all of your changes back to the original atmosphere, either select File -> Revert or press the
 icon. All of your changes will be lost if you revert.
All settings for atmospheres and weather are found in the 5 different tab sections of the editor, described in detail below. If you're not entirely sure what each setting does, play around with extreme values and see what happens!
Skydome & Clouds
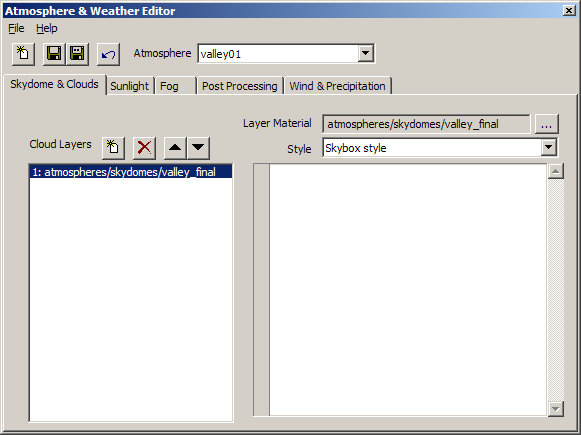
A skydome can be made of several layers. Every layer can have its own material specifying the apperance of the layer. These materials are stored in base/materials/atmospheres/skydomes.mtr. From the editor some simple tweaks to opacity, color tint and animation can be made.
Cloud Layer Images
Cloud layer images can rendered using one of two different mapping styles.
- Old Style - Old-school 6 images on a cube style. Efficient to render and load from disk, but very wasteful in memory, and not so easy to create. Not recommended!
- Skybox style - Two images that specify the sky dome. Efficient to render, fast to load, saves memory, but not so easy to paint. Fortunately it's easy to convert a half-sphere image into a skybox style image (described below). All of the skies in ETQW were made for this style.
To simplify painting these textures there are a number of console commands to convert between image styles.
- halfSphereToCube <filename> - Reads in a half-sphere .tga and outputs a cubemap (6 .tga files)
- halfSphereToSkyBox <filename> - Reads in a half-sphere .tga and outputs a skybox (2 .tga files)
- cubeToSkyBox <filename> - Reads in a cubemap (6 images) and outputs a skybox (2 .tga files)
Cloud Layer Materials
The cloud layer images have to be referenced from materials. A number of templates are available to generate layer materials.
Sky Box Templates
- material/skybox <Image>: Just renders the specified image to the sky, no tranlucency or blending is used. The alpha channel is written so it can be used for bloom control in the sky if needed.
- material/medium_skybox_template <Image>: Renders the specified image on top of the existing sky using the alpha channel to blend with underlying layers.
- material/high_skybox_template <Image>: Renders the specified image on top of the existing sky using additive blending. Alpha can be used for bloom control.
- material/high_skybox_template_nobloom <Image>: Identical to "material/high_skybox_template" but doesn't touch the bloom alpha channel.
Tiled Templates
- material/tiled_ring_template<Image>: A ring of clouds tiled around the horizon (number of repeats is set in the atmosphere editor)
- material/highalt_tiled_template<Image>: Tiles the image over the whole skydome. Works with additive blending.
- material/mediumalt_tiled_template <Image>: Tiles the image over the whole skydome. Works with alpha channel based blending.
Others
- material/highalt_cube_template<Image>: Same as "material/high_skybox_template" but takes a cubemap instead of a skybox.
- material/medium_cube_template<Image>: Same as "material/medium_skybox_template" but takes a cubemap instead of a skybox.
- material/medium_cube_template_no_alpha_write<Image>: Same as "material/medium_cube_template" but doesn't touch the (bloom control) alpha channel.
- material/cloudmatte<Image>: Same as "material/skybox" but takes a cubemap instead of a skybox.
A Typical Skydome Setup
A typical skydome setup would look something like this:
- A Skybox style layer with a material using the material/skybox template to specify the "matte painting" used for the skybox backdrop. Comparable to a skybox found in most games. To find out how to create a skybox in this style, click here.
- One or more layers using a cloud layer template, to add diversity and animation to the sky. Not necessarily required.
Sunlight
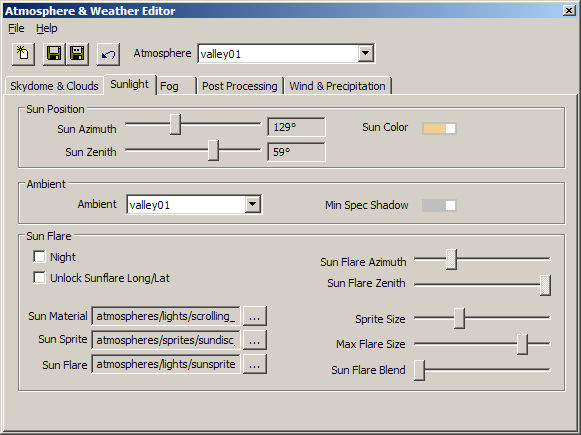
In this tab, you can control all the settings for the position, brightness and colour of the atmosphere's sun light. You can also set different "sun flare" images, and choose which ambient light setup to use in the atmosphere.
Sun Position
- Sun Azimuth - The horizontal position of the sun, from 0 to 360 degrees.
- Sun Zenith - The vertical position of the sun, from 0 to 90 degrees.
- Sun Color - The color of the sun light.
Ambient
- Ambient - This is a drop-down list that selects which ambient light setup you want the outdoor atmosphere to use. You can edit ambient light setups using the Ambient Light Editor. Note that you cannot run the ambient editor and the atmosphere editor at the same time.
- Min Spec Shadow - This sets the color and brightness of shadows rendered when the game in running in "Normal" lighting quality (r_megadrawmethod 3) rather than "High" lighting quality (r_megadrawmethod 0).
Sun Flare
- Night - When checked, this turns off the sun flare, used for night-time atmospheres.
- Unlock Sunflare Long/Lat - When checked, this allows you to position the sun flare image in a different place than the actual sunlight source. Use this carefully, since an atmosphere may look strange when the flare position is considerably different to the actual source of the shadow-casting sun light.
- Sun Flare Azimuth - The horizontal position of the sun flare image, from 0 to 360 degrees. Only available when "Unlock" is checked.
- Sun Flare Zenith - The vertical position of the sun flare image, from 0 to 90 degrees. Only available when "Unlock" is checked.
- Sun Material - Material used to cast animated shadows on the landscape.
- Sun Sprite - The texture used for the sun.
- Sun Flare - The flare texture of the sun.
- Sprite Size - Size of sun texture.
- Max Flare Size - Maximum size of sun flare texture.
- Sun Flare Blend - Blending of sun flare.
Fog
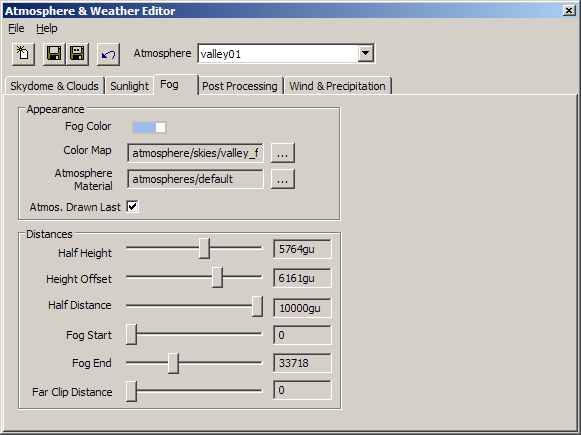
This tab contains all of the settings for your atmosphere's outdoor fog. You can control the distance, colour and density of the fog, which can create a more realistic sense of scale and perspective in a terrain landscape.
Appearance
- Fog Color - This controls the overall color of the fog, if a Color Map is not specified. It can also tint the skybox and STUFF grass fogging in some cases.
- Color Map - This is a half-sphere map and should be quite low resolution, very blurred image. No clouds or special effects should be painted into this map as they will show up in the fog, causing a weird mirror/halo effect.
- A quick way to make a fog image is to down-size your skybox's source image and blur it.
- Atmosphere Material - Atmosphere material.
- Atmos. Drawn Last - Atmosphere drawn last.
Distances
- Half Height - Height of fog.
- Height Offset - Height offset of fog.
- Half Distance - Fog distance.
- Fog Start - Distance before fog starts.
- Fog End - Distance where fog ends.
- Far Clip Distance - Clip geometry beyond this distance (should be a larger value than Fog End).
Post Processing
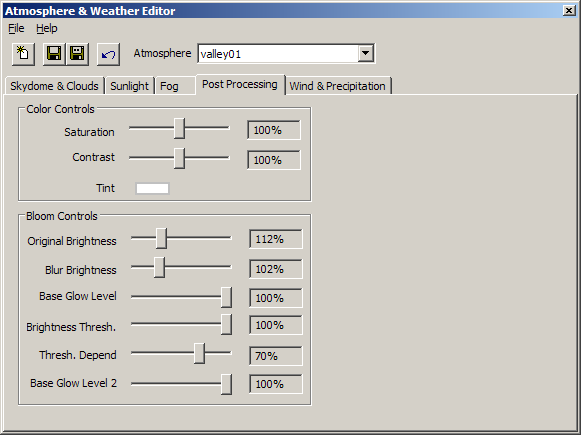
This tab contains all of the settings for post-processing your scene. You can control overall hue tint, saturation, contrast and bloom amounts. Be careful with these as they can wash out a scene or make it look like it's glowing excessively. However, if used correctly, these settings can add subtle moods and stylised visual effects to a level.
Color Controls
It's a good idea to avoid playing with these settings until the texturing of your map is finalised, since it affects the overall coloration of the level.
- Saturation - The overall saturation of your map.
- Contrast - The overall contrast of your map.
- Tint - Tints the whole atmosphere towards a particular color and brightness.
Bloom Controls
These settings control the bloom effects which can add a more realistic touch to the atmosphere if used carefully.
- Original Brightness - The base brightness of the scene.
- Blur Brightness - The brightness of the blurred bloom effect. This is added on top of the original brightness.
- Base Glow Level - The minimum bloom amount of any models and brushwork.
- Brightness Thresh. - The brightness threshold of bloom.
- Thresh. Depend - The sharpness of the bloom.
- Base Glow Level 2 - The minimum bloom amount of any Megatexture.
Wind & Precipitation
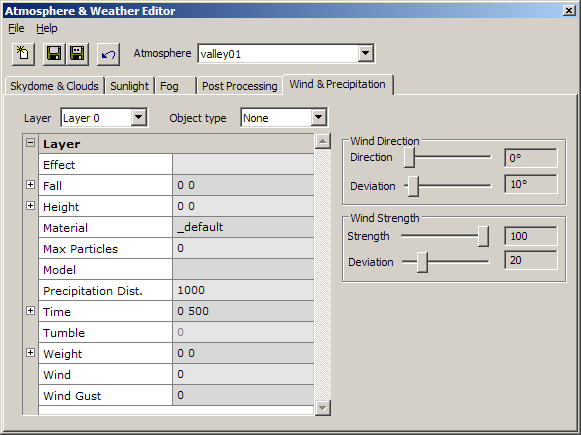
In this tab you can control settings for wind, rain, snow and extra local atmospheric effects.
Layers
You can use up to two layers of precipitation, these can be combined to produce various effects.
- Layer - You can have up to two layers of precipitation or atmospheric effects.
- For example, Layer 0 could be rain, and Layer 1 could be the splash effect for where the rain hits the ground.
- Alternately, Layer 0 could be snow, and Layer 1 would remain unused.
- Object type - This determines what effect will be created in the active layer.
- None - No precipitation will be shown.
- Rain - Draws rain effects.
- Snow - Draws snow effects.
- Splash - Draws splash effects on the ground.
- Model Rain - Draws rain effects using a custom model for each rain particle.
- Model Snow - Draws snow effects using a custom model for each snow particle.
Each Object type has different preset values which are shown in a property list:
- Effect - Select a local atmospheric effect to be displayed around the player. This is separate from the precipitation effect and can be used in addition to it. Local atmospheric effects can be set up in the effects editor.
- Fall - The rate at which precipitation particles will fall. A wider range between "Min" and "Max" will result in a more random scattered effect.
- Height - This value will set the size of the rain or snow particles. Higher values will stretch out rain particles and enlarge snow particles. Particles will be randomly sized from the lower "Min" value up to the "Max" value.
- Material - The material to use on the precipitation particles.
- Max Particles - The maximum amount of particles on screen at any one time. Higher values will create heavier rain-fall or thicker snow-fall effects.
- Model - The model to use for each particle. Only used when the Object type is set to Model Rain or Model Snow.
- Precipitation Dist. - The distance, in game units, that the precipitation effects will be drawn to.
- Time - Time.
- Tumble - Tumble amount.
- Weight - How heavy the particles are.
- Wind - Amount of wind effect.
- Wind Gust - Variance of wind effect.
Wind Direction
- Direction - The horizontal angle, in degrees, of the wind that affects precipitation.
- Deviation - The amount to randomly deviate from the Wind Direction over time.
Wind Strength
- Strength - The strength of the wind that affects precipitation.
- Deviation - The amount to randomly deviate from the Wind Strength over time.
