A Simple First Megatexture
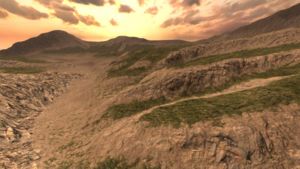
So now that you've made A Simple First Terrain, no doubt you'll want to apply a MegaTexture to it! This MegaTexture won't be as detailed or as attractive as an advanced MegaTexture, but will demonstrate the basics of creating a Surface Tree, assigning textures, and compiling it all into a working MegaTexture file.
Contents
Introduction
For this tutorial you must:
- Have a terrain model UV-mapped in the 0-1 range (covered in the simple first terrain tutorial)
- Have access to some tiling textures. TODO: Link to MegaTexture media!
- Have a little understanding the ETQW material system
If you don't have any of the above things, you are not ready to do this tutorial!
This tutorial covers:
- How to set up a MegaTexture material
- How to create a Surface Tree
- How to add texture nodes in the Terrain Editor
- How to render and compile a full MegaTexture
This tutorial does not cover:
- How to use Blender/Maya/Lightwave/ZBrush/Mudbox/3DSMax/Photoshop
- How to create tiling textures or heightmaps
- Anything overly complicated
Creating a MegaTexture material
Firstly you need to create a new material for your terrain to use. If you have never made a new material before, read the article on Adding Custom Textures. All you need to do is create (or use an existing) .mtr file and place a material declaration in it, in the manner shown here:
material megatextures/mapname { useTemplate megatextures/default_ambient< "mapname" > }
This material would automatically search for a MegaTexture called mapname.mega in the /megatextures/ folder. This example material uses the "default_ambient" template, which expects a 3-channel RGB MegaTexture. These are generated by the default settings of the MegaTexture tab in the SDK Launcher.
Obviously you would want to use the actual name of your map instead of "mapname", for consistency's sake and ease of reference.
Remember that if you made a new .mtr file after the game or editor was started, you'll have to restart the whole game and editor before it will read your new file.
Assigning the material
You should assign the material you just created by naming a material in your 3D application and applying it to your terrain mesh, then export the model to your preferred format (LWO, ASE or OBJ). Tips on this process can be found in the simple first terrain tutorial.
Creating the Surface Tree
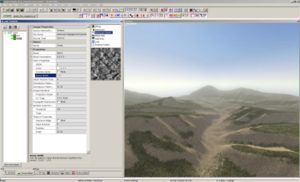
As described in the Simple First Terrain tutorial, terrain models are set up in the Terrain Editor, accessible via shiftN in editWorld. This tool creates a Surface Tree file (.sft) that contains all the information about the terrain, including roads, stamps, and detail texture information that MegaGen needs to generate a MegaTexture.
Add the terrain mesh
Here's how you bring the terrain mesh into the surface tree:
- RMB on the left-hand pane, and choose New -> Tree via the menu.
- If you already have a Root node, click the "Begin Editing" button instead.
- Click on the Root node, and set Model to the name of the terrain mesh, in this case models/terrain/simpleterrain.obj.
- Press enter to confirm the selection, and the terrain should appear in the 3D view.
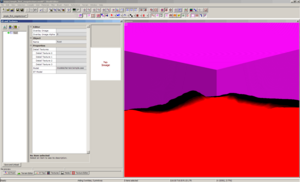
Be aware that your terrain model will probably appear bright orange or red. The console will probably give you a few WARNING messages, don't worry about these for now, this is because your Megatexture doesn't exist yet!
Important note about nodes
When you are editing properties of nodes (names, numbers, texture sources etc.) always remember to hit enter after changing a value, to make sure that the value is stored. If you just type something in and then click somewhere else without pressing enter, your changes may not be applied.
Create the first texture node
Now that the model is in place, you can start laying down the texture layers (or "nodes") that will make up your MegaTexture.
First you need to create a new Image Source node in the Terrain Editor.
- RMB on your "Root" node and choose New -> Image Source (or press shifti)
- This will make a new node called "New Image Renderer". You can rename this using the "Name" property field in the Object section.
You will notice in the top right of the Terrain Editor, a section listing things like "Diffuse", "Distribution", "Distribution Pattern" etc. Selecting one of these will list all of the properties for that section of the current node.
The ones we need to worry about are as follows:
Diffuse
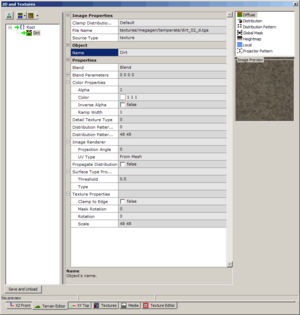
This is the colour map of the current node, and it should point to a tiling TGA texture.
- Make sure the Diffuse section is highlighted in the top right of the Terrain Editor.
- In the File Name field of the Image Properties section, browse to a generic tiling dirt texture. Remember to hit enter afterwards!
- This example is using textures/megagen/temperate/dirt_02_d.tga
- The Scale field at the very bottom of the property list allows you to choose how much to tile the texture.
- The default value is 1 1, but you don't want that since it will stretch your texture over the whole mesh, and look really blurry!
- Instead set the Scale to something like 48 48, this means that the texture will be repeated 48 times across each axis of the terrain. This results in a sharper final output.
That's all you need to do for the Diffuse settings in this node.
Distribution
This is how we control where the layer is drawn (ie. no grass underwater, no sand on angles over 60 degrees etc). It's basically a big mask where white = fully shown and black = fully hidden.
- Make sure the Distribution section is highlighted in the top right.
- Since this is our first node, we want to show over the whole terrain. This means the distribution map should be 100% white.
- You can either assign a pure white TGA texture, or change the Source Type to geometryBased.
- geometryBased will by default create a fully white map, so if you don't have a white TGA handy, this is faster.
Distribution Pattern
This controls how the current node blends into others. Usually this will be set to a tiling TGA heightmap texture that matches the Diffuse texture.
- We don't need a Distribution Pattern for the first node, since it doesn't blend with anything. Nodes on top of this one will need Distribution Patterns for more interesting and natural blends though!
Local
This is the normal-map of the current node. This should be a tiling TGA texture representing the local normal information of the matching Diffuse texture.
- Make sure the Local section is highlighted in the top right.
- In the File Name field of the Image Properties section, browse to the matching normal map for your tiling dirt texture.
- This example is using textures/megagen/temperate/dirt_02_local.tga
- The Local texture's tiling amount is automatically the same as the Diffuse texture.
Previewing the result
Now we can easily check if this is all set up correctly. You should notice a little icon at the top left of your Terrain Editor which looks like this: ![]()
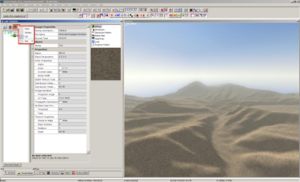
- Notice the drop-down arrow on the right of the button. Click it, and select "Full" instead of "None".
- Your terrain should change colour to black. This means it's ready for a preview to be rendered onto it.
- Click the button itself now, instead of the drop-down. An "Active Tasks" window should pop up, and when it's done, you should see your dirt texture appear on your terrain model.
- You can switch the camera to Render mode too, which will show your terrain model's shading better.
- If you want a full-resolution preview of a small area, choose "Window" instead of "Full" from the drop-down menu.
- This creates a small window that you can move around using LMB-drag in the XY Top view. Simply position the window where you want to preview the full-resolution MegaTexture, and hit the Render Preview button.
Now any time you add new nodes, or change a node's properties, you can just click the Render Preview button and the view will update with your changes.
Adding a second node
Now that the first layer of dirt is in place, we can try putting some grass on top of it!
- Again, RMB on your "Root" node and choose New -> Image Source (or press shifti)
- This will make another new node below your "Dirt" node.
- Name this new node "Grass".
The Surface Tree hierarchy is rendered from the top down, so nodes above other nodes in the hierarchy will be rendered before the other nodes. So currently it'll be rendering our Dirt node, and then rendering the Grass node on top of the dirt.
Again, the main map types need to be specified before the node can be rendered:
Diffuse
- Make sure the Diffuse section is highlighted in the top right of the Terrain Editor.
- In the File Name field of the Image Properties section, browse to a generic tiling grass texture.
- This example is using textures/megagen/temperate/grass_04_d.tga
- Again you will want to set the Scale value to something other than 1 1, to tile your texture. Let's use 32 32 for this one.
Distribution
This is important now, since we need to control where this layer is visible. Pure white won't work, since that'll just completely cover our underlying Dirt node!
- Make sure the Distribution section is highlighted in the top right.
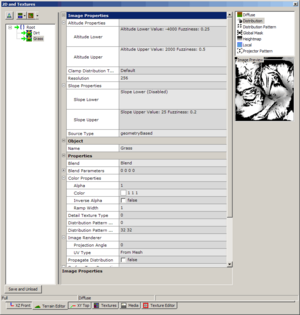
- Change the Source Type from texture to geometryBased.
Geometric Texture Distribution
This is where it gets interesting! There are many settings to alter, and they can have a drastic effect on how different your terrain looks, so try playing around with different values if you're not happy with the initial results.
- Altitude Lower - Enabling this will limit the lower parts of the terrain from receiving this node's textures.
- Altitude Lower Value - The Z height in world units that the node will be drawn above. The default of 0 means that any parts of your terrain mesh below Z=0 will not show any of this node's textures.
- Fuzziness - The amount of blur applied to the mask. The higher the value, the more blurry the boundary.
- Altitude Upper - Enabling this will limit the higher parts of the terrain from receiving this node's textures.
- Altitude Upper Value - The Z height in world units that the node will be drawn below. The default of 0 means that any parts of your terrain mesh above Z=0 will not show any of this node's textures.
- Fuzziness - The amount of blur applied to the mask. The higher the value, the more blurry the boundary.
- Clamp Distribution To Edge - Leave this on Default.
- Resolution - The size in pixels of the resulting mask. The default value of 256 is fine for nearly any terrain model.
- Slope Lower - Enabling this will limit shallower angles of the terrain model from receiving this node's textures.
- Slope Lower Value - The angle in degrees that the node will be drawn past. The default angle of 0 will result in no change to your mask.
- Fuzziness - The amount of blur applied to the mask. The higher the value, the more blurry the boundary.
- Slope Upper - Enabling this will limit the steeper angles of the terrain model from receiving this node's textures. This is great for masking out cliffs from your nodes.
- Slope Upper Value - The angle in degrees that the node will be hidden past. The default angle of 0 will result in a fully black mask.
- Fuzziness - The amount of blur applied to the mask. The higher the value, the more blurry the boundary.
Distribution Pattern
This controls how the the grass will blend into the dirt. If you don't have a Distribution Pattern texture, the grass will just slowly fade into the dirt, which doesn't look very natural! So what we want here is a texture to identify the "height" of the areas of grass. This means that the dirt can blend in based on the height of each clump of grass, so instead of a smooth fade you will get a more natural blend between the grass and the dirt.
- Make sure the Distribution Pattern section is highlighted in the top right.
- In the File Name field of the Image Properties section, browse to the matching heightmap or mask for your tiling grass texture.
- This example is using textures/megagen/temperate/grass_04_mask.tga
- Important! You will also need to set the Distribution Pattern Texture Scale to the same value as the Diffuse Scale, in this case we just use 32 32 again.
Local
Again we want the normal-map which matches the diffuse texture for the grass.
- Make sure the Local section is highlighted in the top right.
- In the File Name field of the Image Properties section, browse to the matching normal map for your tiling grass texture.
- This example is using textures/megagen/temperate/grass_04_local.tga
Preview again!
Now that's all set up, you can hit the Render Preview (![]() ) button again and see what effect the new Grass node has.
If it's being distributed into the wrong places, you can go back into your Distribution settings and tweak the values for the geometryBased settings. Then you can preview again until it looks right.
) button again and see what effect the new Grass node has.
If it's being distributed into the wrong places, you can go back into your Distribution settings and tweak the values for the geometryBased settings. Then you can preview again until it looks right.
That's it!
You've now created your very own MegaTexture to use in your map!
See Also
- An Advanced Terrain and Megatexture - an advanced guide for complete MegaTexture creation
- Generate a MegaTexture - steps for generating a MegaTexture from the SDK launcher.
