Difference between revisions of "A Simple First Map"
(→Advanced Bits and Pieces) |
(→Atmosphere) |
||
| (21 intermediate revisions by 2 users not shown) | |||
| Line 1: | Line 1: | ||
This is the barebones guide to creating a barebones map. It won't have terrain nor much gameplay, but it will demonstrate the basics of mapping for ETQW, including how to launch the editor, create a basic map, then compile and run it. | This is the barebones guide to creating a barebones map. It won't have terrain nor much gameplay, but it will demonstrate the basics of mapping for ETQW, including how to launch the editor, create a basic map, then compile and run it. | ||
| + | |||
| + | == Setting up the SDK Launcher == | ||
| + | [[Image:simplemap_launcher.png|thumb|400px|right|SDK Launcher]] | ||
| + | The trickiest bit here is ensuring the paths of the SDK Launcher are correct. The simplest way to do this is set both 'Retail Path' and 'Save Path' to the directory where ETQW is installed. This is typically {{filename|C:\Program Files\id Software\Enemy Territory - QUAKE Wars}}. If you select the incorrect directory, the SDK Launcher will warn you and the game will not launch. | ||
| + | |||
| + | {{clear}} | ||
== Launch the Editor == | == Launch the Editor == | ||
| Line 30: | Line 36: | ||
Creating a brush is simple - just drag your mouse in the 2D (grid) view. This will draw a red outline representing the brush you've now created. | Creating a brush is simple - just drag your mouse in the 2D (grid) view. This will draw a red outline representing the brush you've now created. | ||
| − | In this case, we've drawn a brush 256 units long and 256 units wide. The player is | + | In this case, we've drawn a brush 256 units long and 256 units wide. The player is 32 units wide, and can easily fit into a room of this size. |
| + | |||
| + | ''You can drag the 2D view around by dragging with {{accelbtn|rmb}}.'' | ||
| + | |||
{{clear}} | {{clear}} | ||
| Line 37: | Line 46: | ||
You can use {{accelkey|ctrl}}{{accelkey|tab}} to move through each view - top, front, side - as much as you want. Press it until you get to the 'XZ Front' or 'YZ Side' view (as indicated in blue text in the top-left corner of the window). This lets you see how tall the room is as well as how long and wide it is. | You can use {{accelkey|ctrl}}{{accelkey|tab}} to move through each view - top, front, side - as much as you want. Press it until you get to the 'XZ Front' or 'YZ Side' view (as indicated in blue text in the top-left corner of the window). This lets you see how tall the room is as well as how long and wide it is. | ||
| − | You may notice the brush is just 64 units high - too short for the player! | + | You may notice the brush is just 64 units high - if we were to hollow the brush now, the room would be too short for the player! |
| + | |||
| + | This is easily fixed by making the brush taller. Make sure the brush is still selected (highlighted red - use {{accelkey|shift}}{{accelkey|lmb}} to select it if not) and place your mouse just above the brush in the YZ side view. Then drag upwards with {{accelkey|lmb}} until the brush is about 128 units tall. | ||
| + | |||
| + | ''Brushes can be deleted by selecting them and pressing {{accelkey|backspace}}.'' | ||
| − | |||
{{clear}} | {{clear}} | ||
| Line 91: | Line 103: | ||
== Compiling == | == Compiling == | ||
[[Image:simplemap_ingame.jpg|thumb|400px|right|The map ingame]] | [[Image:simplemap_ingame.jpg|thumb|400px|right|The map ingame]] | ||
| − | Now the map is in a state that it can be compiled and run. First, save your map | + | Now the map is in a state that it can be compiled and run. First, save your map using the File menu - you should call it something like 'simplemap' and make sure it is in the '/maps' directory. |
Select the 'Compile' Menu and choose '1 - Compile' - this will perform a basic compile of the map and if all goes well, the console window will show a lot of blue output, ending with 'Checking for pointfile... None found.' | Select the 'Compile' Menu and choose '1 - Compile' - this will perform a basic compile of the map and if all goes well, the console window will show a lot of blue output, ending with 'Checking for pointfile... None found.' | ||
Now to run the map, press {{accelkey|F2}} to focus the game window, go to the console, and type {{consolecmd|devmap simplemap}}. This will load this simple map, and let you spawn as either side. | Now to run the map, press {{accelkey|F2}} to focus the game window, go to the console, and type {{consolecmd|devmap simplemap}}. This will load this simple map, and let you spawn as either side. | ||
| + | |||
| + | ''If the console says 'User Map Start Denied Unknown Campaign', you should type {{consolecmd|si_rules sdGameRulesObjective}} before your {{consolecmd|devmap simplemap}} command. This lets the game know you want to run a map rather than a campaign.'' | ||
''The compiler does several things. First, it works out where the inside of your map is by finding the player start. It then checks that the map is sealed by trying to find a way from the player start to the outside of the map. Once it is sure the map is sealed, it finds all the faces visible from inside the map, and saves them. That's why the resulting map only has 6 faces even if you {{consolecmd|noclip}} outside of it - one for each of the walls, the floor and the ceiling - all the others have been removed for you.'' | ''The compiler does several things. First, it works out where the inside of your map is by finding the player start. It then checks that the map is sealed by trying to find a way from the player start to the outside of the map. Once it is sure the map is sealed, it finds all the faces visible from inside the map, and saves them. That's why the resulting map only has 6 faces even if you {{consolecmd|noclip}} outside of it - one for each of the walls, the floor and the ceiling - all the others have been removed for you.'' | ||
| Line 113: | Line 127: | ||
* Add entities | * Add entities | ||
* Compile and run maps | * Compile and run maps | ||
| + | |||
| + | '''Get comfortable with creating, resizing and moving brushes. Also practise lining up brushes to each other. Brushes are the fundamental building blocks of level design.''' | ||
| + | |||
| + | Remember to use the [[Design: How do I|How do I...?]] page for a quick reference to shortcuts and mouse buttons. | ||
'''Here are some things to try:''' | '''Here are some things to try:''' | ||
| + | * Repeat the process but make the room 2048 units wide and long | ||
* Add some different colour lights! | * Add some different colour lights! | ||
* Change all the textures | * Change all the textures | ||
* Add some brushwork to the middle of the room | * Add some brushwork to the middle of the room | ||
| − | * Make the room | + | * Make the room bigger by moving and stretching brushes - but keep it sealed! |
* Create the room but instead of using the hollow tool, create the floor, wall and ceiling brushes manually | * Create the room but instead of using the hollow tool, create the floor, wall and ceiling brushes manually | ||
* Add a [[Map Object]] | * Add a [[Map Object]] | ||
| + | |||
| + | '''Once you're comfortable, continue onto [[A Simple Second Map]].''' | ||
== Advanced Bits and Pieces == | == Advanced Bits and Pieces == | ||
=== Atmosphere === | === Atmosphere === | ||
| − | You may have noticed that in-game, the map is multi-coloured and doesn't have a sky. This is because the map lacks an [[Entity atmosphere|atmosphere]] entity. You should create this entity in the normal fashion, then use the 'Property Editor' ({{accelkey|N}}) to assign an atmosphere. The easiest way to do this is to expand 'Available Keys', select | + | You may have noticed that in-game, the map is multi-coloured and doesn't have a sky. This is because the map lacks an [[Entity atmosphere|atmosphere]] entity. You should create this entity in the normal fashion, then use the 'Property Editor' ({{accelkey|N}}) to assign an atmosphere. The easiest way to do this is to expand 'Available Keys', select {{keyname|atmospheredecl}}, and at the bottom of the inspector window where it says 'Value', enter {{keyvalue|refinery01}} to use Refinery's atmosphere. You can use the real-time renderer ({{accelkey|F3}}) to preview atmospheres in the 3D view. |
=== Texturing Brush Faces === | === Texturing Brush Faces === | ||
| Line 133: | Line 154: | ||
=== Hollowing === | === Hollowing === | ||
| − | The 'Hollow' tool is actually used very rarely; it is preferable to create each wall, floor and ceiling brush individually, as this gives you the most control. It is used in this tutorial to guarantee the creation of a sealed room of the correct size. | + | The 'Hollow' tool is actually used very rarely; it is preferable to create each wall, floor and ceiling brush individually, as this gives you the most control. It is used in this tutorial to guarantee the creation of a sealed room of the correct size ([[A_Simple_Second_Map|the next tutorial]] follows these guidelines.) |
== See Also == | == See Also == | ||
* [[Design: How do I|How do I...?]] - how to do common tasks | * [[Design: How do I|How do I...?]] - how to do common tasks | ||
| − | * [[ | + | * [[A Simple Second Map]] - the next tutorial |
| + | * [[An Advanced Map]] - a more complex guide to creating a map, including terrain | ||
* [[Design: Troubleshooting]] - troubleshooting guide | * [[Design: Troubleshooting]] - troubleshooting guide | ||
| − | |||
[[Category:Basic Level Design]] | [[Category:Basic Level Design]] | ||
| + | [[Category:Tutorials]] | ||
Latest revision as of 10:04, 14 December 2007
This is the barebones guide to creating a barebones map. It won't have terrain nor much gameplay, but it will demonstrate the basics of mapping for ETQW, including how to launch the editor, create a basic map, then compile and run it.
Contents
Setting up the SDK Launcher
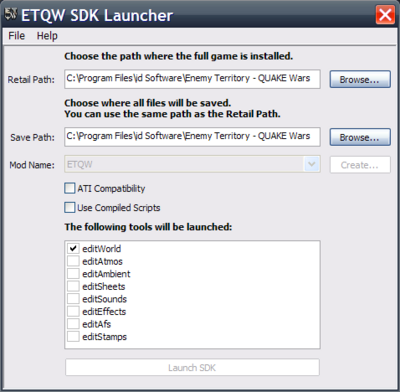
The trickiest bit here is ensuring the paths of the SDK Launcher are correct. The simplest way to do this is set both 'Retail Path' and 'Save Path' to the directory where ETQW is installed. This is typically C:\Program Files\id Software\Enemy Territory - QUAKE Wars. If you select the incorrect directory, the SDK Launcher will warn you and the game will not launch.
Launch the Editor
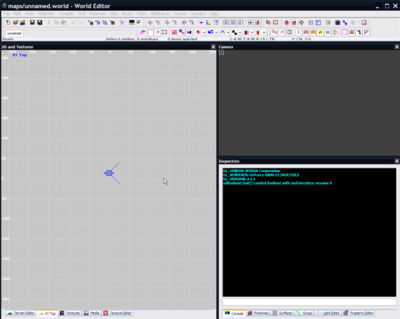
Having installed the SDK and set up its paths correctly, tick the 'editWorld' tickbox and press the 'Launch SDK' button. A few moments later and the editor should be loaded with a blank, empty map.
Map Basics
Before we do anything further, you need to be aware of the basic requirements for a map:
- It needs a sealed environment
- It needs a player start entity
- It needs a light entity
Once we have those, the map can be saved, compiled and run.
Creating The Environment
The most basic environment consists of four walls, plus a floor and a ceiling. Each of these is made out of a brush (a 3D block of solid matter) - a brush for each wall, a brush for the ceiling, and a brush for the floor (a total of six brushes). These brushes need to be placed to form a box with no gaps in between them, and assigned an attractive texture.
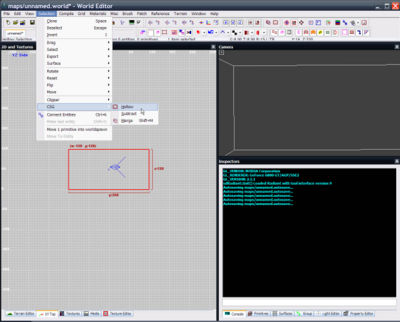
The simplest way to do this is to use the 'Hollow' function. This lets you create just one brush the size of the room you want, which the 'Hollow' function uses as a template to automatically create the wall, floor and ceiling brushes for you.
Creating a brush
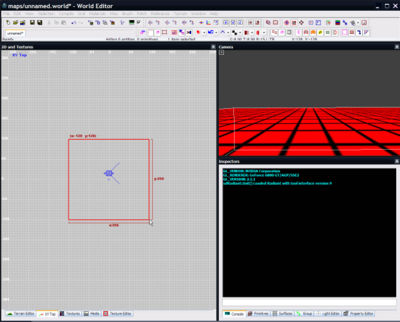
By default, the 2D view is a 'top-down' view of your map. So by creating a brush here, we can choose the length and width of the room, but not its height.
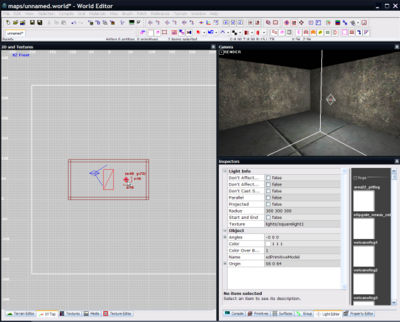
Creating a brush is simple - just drag your mouse in the 2D (grid) view. This will draw a red outline representing the brush you've now created.
In this case, we've drawn a brush 256 units long and 256 units wide. The player is 32 units wide, and can easily fit into a room of this size.
You can drag the 2D view around by dragging with rmb.
Modifying a brush
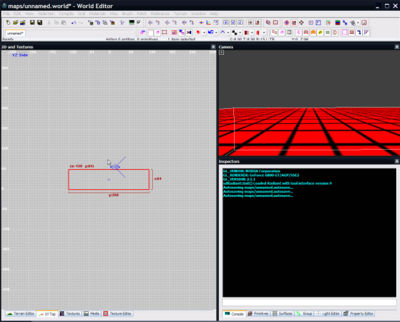
You can use ctrltab to move through each view - top, front, side - as much as you want. Press it until you get to the 'XZ Front' or 'YZ Side' view (as indicated in blue text in the top-left corner of the window). This lets you see how tall the room is as well as how long and wide it is.
You may notice the brush is just 64 units high - if we were to hollow the brush now, the room would be too short for the player!
This is easily fixed by making the brush taller. Make sure the brush is still selected (highlighted red - use shiftlmb to select it if not) and place your mouse just above the brush in the YZ side view. Then drag upwards with lmb until the brush is about 128 units tall.
Brushes can be deleted by selecting them and pressing backspace.
Hollowing a brush
We now have a brush the same size as the room we want to create. Unfortunately, it's just a solid lump of matter. We need to make it a room by hollowing it out.
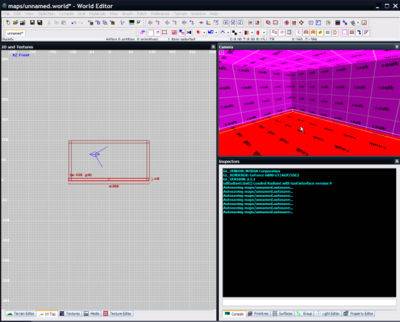
The quickest and simplest way to do this is use the 'CSG Hollow' tool. This simply uses your selected brush as a template to create 6 more brushes that encompass it. The tool also deletes your original brush, leaving you with a room built out of 6 brushes - 4 walls, a ceiling and a floor.
You can use the 3D camera to see the result of the hollowing process. rmb on the 3D view to toggle control of the camera, and use mousewheel to move forward and backward.
The important thing to realise here is that the room is sealed - there's absolutely no way to see from the inside of the room to the outside. If there were a hole somewhere, the compiler would report a 'leak' and you would not be able to run the map.
Texturing
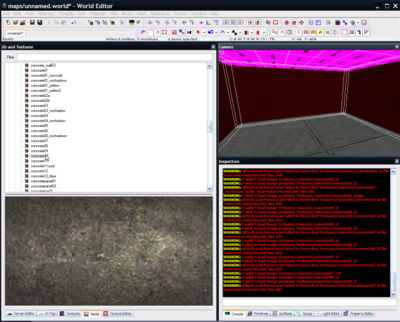
Using the 3D camera, you may notice the brushes are textured using the caulk texture (on the inside) and some other texture (on the outside). In the game, any surface with the 'caulk' texture is invisible, and has sky drawn on it instead. So right now, this room isn't a room at all - or at least won't look like one in-game - it'll just be sky (or black) wherever the player looks.
To give the room a visible floor, you need to select the floor and assign a texture. First, press esc to deselect everything else, then select just the floor brush by clicking on it in the 3D view with shiftlmb, so it is highlighted in red.
Now the brush is selected, it can be assigned a texture by using the 'Media' tab at the bottom of the 2D view, and finding an appropriate texture from the library. This example will use 'concrete/concrete_floor01' - as soon as you select it, you should notice the 3D view updates to show this.
You can also texture the walls by first deselecting the floor (esc) and using the 3D view to select (shiftlmb) each of the 4 walls in turn so they're all selected. Then use the media browser again to assign a different texture to them - for example 'concrete/concrete10'.
If you wish, you can repeat this for the ceiling. Or, you can leave the ceiling using the 'caulk' texture so that the sky shows through.
Creating The Player Start
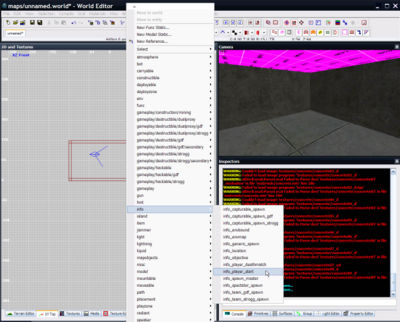
The map needs a player start entity placed into it so the compiler knows the inside of the map from the outside, and so the game knows where to spawn players when they load the map. Since this is a simple map, we're going to create just one player spawn that can be used by both teams - an info_player_start entity.
First switch back to the 2D grid view (using the tabs at the bottom of the '2D and Textures' window). rmb inside the room to bring up a list of entities, and inside the 'info' category choose 'info_player_start'. This will create an 'info_player_start' entity where you clicked - but you can move it around by dragging with lmb. Check the front/side views (ctrltab) to make sure the player start point is completely inside the room - if not, use lmb to drag it into place. This now means that when the map is run, the player will spawn at the position of the 'info_player_start' entity.
A normal map would have a number of player start entities, either 'info_team_gdf_spawn' for the GDF, or 'info_team_strogg_spawn' for the Strogg. The game will pick an appropriate entity for whichever side the player is on, and spawn them at that position.
Creating Light
This is the final stage of the simple map. While the map now has a sealed environment and a player start point, it is completely unlit and will be in complete pitch-black darkness. You can confirm this for yourself by toggling the real-time 3D renderer with f3 - in this mode, the 3D view shows exactly how the map would look in-game.
The simplest way to resolve this is to add a light source. First, deselect the player start if you haven't already by pressing ESC to make sure nothing is selected. Then use rmb to bring up the entity list again and select 'light' from the 'light' category. You can move it around inside the level using lmb as before. If you have the real-time renderer turned on still (f3) you should see the light moving around inside your map.
You can change the colour of the light using the Light Editor - press J to access it.
Compiling
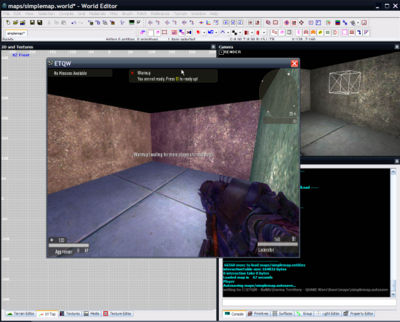
Now the map is in a state that it can be compiled and run. First, save your map using the File menu - you should call it something like 'simplemap' and make sure it is in the '/maps' directory.
Select the 'Compile' Menu and choose '1 - Compile' - this will perform a basic compile of the map and if all goes well, the console window will show a lot of blue output, ending with 'Checking for pointfile... None found.'
Now to run the map, press F2 to focus the game window, go to the console, and type devmap simplemap. This will load this simple map, and let you spawn as either side.
If the console says 'User Map Start Denied Unknown Campaign', you should type si_rules sdGameRulesObjective before your devmap simplemap command. This lets the game know you want to run a map rather than a campaign.
The compiler does several things. First, it works out where the inside of your map is by finding the player start. It then checks that the map is sealed by trying to find a way from the player start to the outside of the map. Once it is sure the map is sealed, it finds all the faces visible from inside the map, and saves them. That's why the resulting map only has 6 faces even if you noclip outside of it - one for each of the walls, the floor and the ceiling - all the others have been removed for you.
That's it!
You've now created the most simple map possible - well done! You can now play around as much as you like.
You should now know how to:
- Launch the editor
- Change between 2D top/front/side views
- Navigate the 3D view
- Create and select brushes
- Move and resize brushes
- Texture brushes
- Add entities
- Compile and run maps
Get comfortable with creating, resizing and moving brushes. Also practise lining up brushes to each other. Brushes are the fundamental building blocks of level design.
Remember to use the How do I...? page for a quick reference to shortcuts and mouse buttons.
Here are some things to try:
- Repeat the process but make the room 2048 units wide and long
- Add some different colour lights!
- Change all the textures
- Add some brushwork to the middle of the room
- Make the room bigger by moving and stretching brushes - but keep it sealed!
- Create the room but instead of using the hollow tool, create the floor, wall and ceiling brushes manually
- Add a Map Object
Once you're comfortable, continue onto A Simple Second Map.
Advanced Bits and Pieces
Atmosphere
You may have noticed that in-game, the map is multi-coloured and doesn't have a sky. This is because the map lacks an atmosphere entity. You should create this entity in the normal fashion, then use the 'Property Editor' (N) to assign an atmosphere. The easiest way to do this is to expand 'Available Keys', select atmospheredecl, and at the bottom of the inspector window where it says 'Value', enter refinery01 to use Refinery's atmosphere. You can use the real-time renderer (F3) to preview atmospheres in the 3D view.
Texturing Brush Faces
This tutorial only demonstrates how to texture entire brushes - that is, how to change all the faces of a brush to the same texture. It is also possible to change just one brush face at a time, by selecting brush faces using ctrlshiftlmb in the 3D view. Then apply a texture using the Media Browser as you would a brush.
- Try creating a brush and applying a different texture on each face to practise this.
Hollowing
The 'Hollow' tool is actually used very rarely; it is preferable to create each wall, floor and ceiling brush individually, as this gives you the most control. It is used in this tutorial to guarantee the creation of a sealed room of the correct size (the next tutorial follows these guidelines.)
See Also
- How do I...? - how to do common tasks
- A Simple Second Map - the next tutorial
- An Advanced Map - a more complex guide to creating a map, including terrain
- Design: Troubleshooting - troubleshooting guide
