Difference between revisions of "A Simple First Megatexture"
(→Further tweaks) |
(→Render the MegaTexture) |
||
| Line 295: | Line 295: | ||
For each node, you should also set the {{keyvname|Distribution Pattern Texture Rotation}} to match the Rotation value if you want your distribution patterns to line up and work correctly. | For each node, you should also set the {{keyvname|Distribution Pattern Texture Rotation}} to match the Rotation value if you want your distribution patterns to line up and work correctly. | ||
| − | = Render the MegaTexture = | + | == Render the MegaTexture == |
=== Save the Surface Tree === | === Save the Surface Tree === | ||
Once you're happy with how the preview looks in the editor, you should make sure that your final Surface Tree is saved. Either click the "Save and Unload" button in the Terrain Editor, or save the whole map. | Once you're happy with how the preview looks in the editor, you should make sure that your final Surface Tree is saved. Either click the "Save and Unload" button in the Terrain Editor, or save the whole map. | ||
| Line 310: | Line 310: | ||
=== Run the SDK Launcher === | === Run the SDK Launcher === | ||
Now that your ''.sft'' is saved, go through all the steps outlined in the [[Generate a MegaTexture]] tutorial. | Now that your ''.sft'' is saved, go through all the steps outlined in the [[Generate a MegaTexture]] tutorial. | ||
| − | |||
= That's it! = | = That's it! = | ||
Revision as of 15:07, 17 December 2007
So now that you've made A Simple First Terrain, no doubt you'll want to apply a MegaTexture to it! This MegaTexture won't be as detailed or as attractive as an advanced MegaTexture, but will demonstrate the basics of creating a Surface Tree, assigning textures, and compiling it all into a working MegaTexture file.
Contents
- 1 Introduction
- 2 Creating a MegaTexture material
- 3 Creating the Surface Tree
- 4 That's it!
- 5 Troubleshooting
- 6 See Also
Introduction
For this tutorial you must:
- Have a terrain model UV-mapped in the 0-1 range (covered in the simple first terrain tutorial)
- Have access to some tiling textures.
- Have a little understanding the ETQW material system
If you don't have any of the above things, you are not ready to do this tutorial!
This tutorial covers:
- How to set up a MegaTexture material
- How to create a Surface Tree
- How to add texture nodes in the Terrain Editor
- How to render and compile a full MegaTexture
This tutorial does not cover:
- How to use Blender/Maya/Lightwave/ZBrush/Mudbox/3DSMax/Photoshop
- How to create tiling textures or heightmaps
- Anything overly complicated
Creating a MegaTexture material
Firstly you need to create a new material for your terrain to use. If you have never made a new material before, read the article on Adding Custom Textures. All you need to do is create (or use an existing) .mtr file and place a material declaration in it, in the manner shown here:
material megatextures/mapname { useTemplate megatextures/default_ambient< "mapname" > }
This material would automatically search for a MegaTexture called mapname.mega in the /megatextures/ folder. This example material uses the "default_ambient" template, which expects a 3-channel RGB MegaTexture. These are generated by the default settings of the MegaTexture tab in the SDK Launcher.
Obviously you would want to use the actual name of your map instead of "mapname", for consistency's sake and ease of reference.
Remember that if you made a new .mtr file after the game or editor was started, you'll have to restart the whole game and editor before it will read your new file.
Assigning the material
You should assign the material you just created by naming a material in your 3D application and applying it to your terrain mesh, then export the model to your preferred format (LWO, ASE or OBJ). Tips on this process can be found in the simple first terrain tutorial.
Creating the Surface Tree
As described in the Simple First Terrain tutorial, terrain models are set up in the Terrain Editor, accessible via shiftN in editWorld. This tool creates a Surface Tree file (.sft) that contains all the information about the terrain, including roads, stamps, and detail texture information that MegaGen needs to generate a MegaTexture. The Surface Tree will be saved every time the map is saved, or any time you press the "Save and Unload" button in the Terrain Editor.
Add the terrain mesh
Here's how you bring the terrain mesh into the surface tree:
- RMB on the left-hand pane, and choose New -> Tree via the menu.
- If you already have a Root node, click the "Begin Editing" button instead.
- Click on the Root node, and set Model to the name of the terrain mesh, in this case models/terrain/simpleterrain.obj.
- Press enter to confirm the selection, and the terrain should appear in the 3D view.
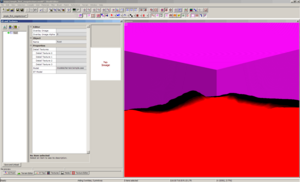
Be aware that your terrain model will probably appear bright orange or red. The console will probably give you a few WARNING messages, don't worry about these for now, this is because your Megatexture doesn't exist yet!
Important note about nodes
When you are editing properties of nodes (names, numbers, texture sources etc.) always remember to hit enter after changing a value, to make sure that the value is stored. If you just type something in and then click somewhere else without pressing enter, your changes may not be applied.
Create the first texture node
Now that the model is in place, you can start laying down the texture layers (or "nodes") that will make up your MegaTexture.
First you need to create a new Image Source node in the Terrain Editor.
- RMB on your "Root" node and choose New -> Image Source (or press shifti)
- This will make a new node called "New Image Renderer".
- You can rename this new node using the "Name" property field in the Object section.
- Rename the node "Dirt".
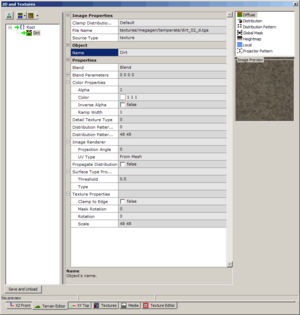
You will notice in the top right of the Terrain Editor, a section listing things like "Diffuse", "Distribution", "Distribution Pattern" etc. Selecting one of these will list all of the properties for that section of the current node.
The ones we need to worry about are as follows:
Diffuse
This is the colour map of the current node, and it should point to a tiling TGA texture.
- Make sure the Diffuse section is highlighted in the top right of the Terrain Editor.
- In the File Name field of the Image Properties section, browse to a generic tiling dirt texture. Remember to hit enter afterwards!
- This example is using textures/megagen/temperate/dirt_02_d.tga
- The Scale field at the very bottom of the property list allows you to choose how much to tile the texture.
- The default value is 1 1, but you don't want that since it will stretch your texture over the whole mesh, and look really blurry!
- Instead set the Scale to something like 48 48, this means that the texture will be repeated 48 times across each axis of the terrain. This results in a sharper final output.
That's all you need to do for the Diffuse settings in this node.
Distribution
This is how we control where the layer is drawn (ie. no grass underwater, no sand on angles over 60 degrees etc). It's basically a big mask where white = fully shown and black = fully hidden.
- Make sure the Distribution section is highlighted in the top right.
- Since this is our first node, we want to show over the whole terrain. This means the distribution map should be 100% white.
- You can either assign a pure white TGA texture, or change the Source Type to geometryBased.
- geometryBased will by default create a fully white map, so if you don't have a white TGA handy, this is faster.
Distribution Pattern
This controls how the current node blends into others. Usually this will be set to a tiling TGA heightmap texture that matches the Diffuse texture.
- We don't need a Distribution Pattern for the first node, since it doesn't blend with anything. Nodes on top of this one will need Distribution Patterns for more interesting and natural blends though!
Local
This is the normal-map of the current node. This should be a tiling TGA texture representing the local normal information of the matching Diffuse texture.
- Make sure the Local section is highlighted in the top right.
- In the File Name field of the Image Properties section, browse to the matching normal map for your tiling dirt texture.
- This example is using textures/megagen/temperate/dirt_02_local.tga
- The Local texture's tiling amount is automatically the same as the Diffuse texture.
Surface Type
Your image nodes should all specify a surface type, so that when players walk over or shoot the surface, it gives the correct sound and particle effects.
- Find the Surface Type Properties section of the property list.
- In the Type field, enter dirt. It should drop down a list of valid surface types as soon as you hit the first letter.
- Hit enter to accept the surface type.
Your dirt textures will now produce correct "dirt" effects when shot or collided with!
Previewing the result
Now we can easily check if this is all set up correctly. You should notice a little icon at the top left of your Terrain Editor which looks like this: ![]()
- Notice the drop-down arrow on the right of the button. Click it, and select "Full" instead of "None".
- Your terrain should change colour to black. This means it's ready for a preview to be rendered onto it.
- Click the button itself now, instead of the drop-down. An "Active Tasks" window should pop up, and when it's done, you should see your dirt texture appear on your terrain model.
- You can switch the camera to Render mode too, which will show your terrain model's shading better.
- If you want a full-resolution preview of a small area, choose "Window" instead of "Full" from the drop-down menu.
- This creates a small window that you can move around using LMB-drag in the XY Top view. Simply position the window where you want to preview the full-resolution MegaTexture, and hit the Render Preview button.
Now any time you add new nodes, or change a node's properties, you can just click the Render Preview button and the view will update with your changes.
Important note: Running a 3D application such as Blender, Maya, 3dsmax etc. in the background, may prevent a MegaTexture preview being rendered correctly. If your node is set up correctly but the preview render is appearing as black or patchy, make sure you have closed any 3D applications and try re-rendering the preview.
Adding a second node
Now that the first layer of dirt is in place, we can try putting some grass on top of it!
- Again, RMB on your "Root" node and choose New -> Image Source (or press shifti)
- This will make another new node below your "Dirt" node.
- Name this new node "Grass".
The Surface Tree hierarchy is rendered from the top down, so nodes above other nodes in the hierarchy will be rendered before the other nodes. So currently it'll be rendering our Dirt node, and then rendering the Grass node on top of the dirt.
Again, the main map types need to be specified before the node can be rendered:
Diffuse
- Make sure the Diffuse section is highlighted in the top right of the Terrain Editor.
- In the File Name field of the Image Properties section, browse to a generic tiling grass texture.
- This example is using textures/megagen/temperate/grass_04_d.tga
- Again you will want to set the Scale value to something other than 1 1, to tile your texture. Let's use 32 32 for this one.
Distribution
This is important now, since we need to control where this layer is visible. Pure white won't work, since that'll just completely cover our underlying Dirt node!
- Make sure the Distribution section is highlighted in the top right.
- Change the Source Type from texture to geometryBased.
Geometric Texture Distribution
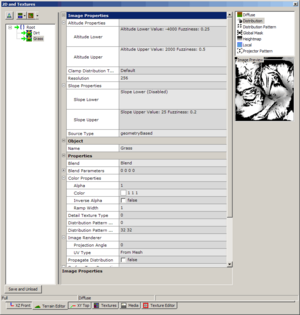
This is where it gets interesting! There are many settings to alter, and they can have a drastic effect on how different your terrain looks, so try playing around with different values if you're not happy with the initial results.
- Altitude Lower - Enabling this will limit the lower parts of the terrain from receiving this node's textures.
- Altitude Lower Value - The Z height in world units that the node will be drawn above. The default of 0 means that any parts of your terrain mesh below Z=0 will not show any of this node's textures.
- Fuzziness - The amount of blur applied to the mask, ranges between 0.0 and 1.0. The higher the value, the more blurry the boundary.
- Altitude Upper - Enabling this will limit the higher parts of the terrain from receiving this node's textures.
- Altitude Upper Value - The Z height in world units that the node will be drawn below. The default of 0 means that any parts of your terrain mesh above Z=0 will not show any of this node's textures.
- Fuzziness - The amount of blur applied to the mask, ranges between 0.0 and 1.0. The higher the value, the more blurry the boundary.
- Clamp Distribution To Edge - Leave this on Default.
- Resolution - The size in pixels of the resulting mask. The default value of 256 is fine for nearly any terrain model.
- Slope Lower - Enabling this will limit shallower angles of the terrain model from receiving this node's textures.
- Slope Lower Value - The angle in degrees that the node will be drawn past. The default angle of 0 will result in no change to your mask.
- Fuzziness - The amount of blur applied to the mask, ranges between 0.0 and 1.0. The higher the value, the more blurry the boundary.
- Slope Upper - Enabling this will limit the steeper angles of the terrain model from receiving this node's textures. This is great for masking out cliffs from your nodes.
- Slope Upper Value - The angle in degrees that the node will be hidden past. The default angle of 0 will result in a fully black mask.
- Fuzziness - The amount of blur applied to the mask, ranges between 0.0 and 1.0. The higher the value, the more blurry the boundary.
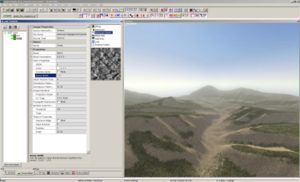
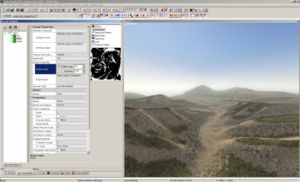
The settings you use for each of these will vary depending on your terrain model, and the type of node you're making. For our Grass node, you can see the settings used for this example in the screenshot above on the right.
Distribution Pattern
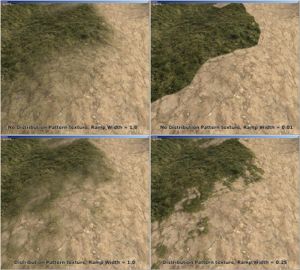
This controls how the the grass will blend into the dirt. If you don't have a Distribution Pattern texture, the grass will just slowly fade into the dirt, which doesn't look very natural! So what we want here is a texture to identify the "height" of the areas of grass. This means that the dirt can blend in based on the height of each clump of grass, so instead of a smooth fade you will get a more natural blend between the grass and the dirt.
If you examine the screenshot to the right, you can see what effect a good Distribution Pattern can have - when the node is rendered with no Distribution Pattern, the blend between the nodes is a simple smooth gradient, which does not look very natural at all. You can also see the difference that the Ramp Width value makes - this is a very powerful value, so experiment with it until you really understand the effect it has!
- Make sure File Name field of the Image Properties section, browse to the matching heightmap or mask for your tiling grass texture.
- This example is using textures/megagen/temperate/grass_04_mask.tga
- The Ramp Width should be set to a value lower than the default of 1, since this causes a very blurry blend, which is usually not what you want. Try a value of 0.25 and re-render the preview - try a "Window" preview as described earlier to get a full-resolution preview where you can really see Distribution Pattern Texture Scale to the same value as the Diffuse Scale, in this case we just use 32 32 again.
Local
Again we want the normal-map which matches the diffuse texture for the grass.
- Make sure the Local section is highlighted in the top right.
- In the File Name field of the Image Properties section, browse to the matching normal map for your tiling grass texture.
- This example is using textures/megagen/temperate/grass_04_local.tga
Surface Type
Again, you need to specify a surface type, so that when players walk over or shoot the surface, it gives the correct sound and particle effects.
- Find the Surface Type Properties section of the property list.
- In the Type field, enter grass. It should drop down a list of valid surface types as soon as you hit the first letter.
- Hit enter to accept the surface type.
Your grass textures should now produce correct "grass" effects when shot or collided with!
Preview again!
Now that's all set up, you can hit the Render Preview (![]() ) button again and see what effect the new Grass node has.
If it's being distributed into the wrong places, you can go back into your Distribution settings and tweak the values for the geometryBased settings. Then you can preview again until it looks right.
) button again and see what effect the new Grass node has.
If it's being distributed into the wrong places, you can go back into your Distribution settings and tweak the values for the geometryBased settings. Then you can preview again until it looks right.
Adding a third node
Now that the grass and dirt are in place, we need some rocks to make the terrain look more natural.
- Add a new Image Renderer node below your "Grass" node and name it "Rock".
Again, the main map types need to be specified before the node can be rendered:
Diffuse
- Set the Diffuse texture and scale.
- This example is using textures/megagen/temperate/rock_01_d.tga at a scale of 32 32
Distribution
Again we can use Geometric Texture Distribution to easily apply the rock textures only to the cliff-like angles.
- Make sure the Distribution section is highlighted in the top right.
- Change the Source Type to geometryBased.
- To make the rock texture only appear on near vertical surfaces, set the Slope Lower Value to 23, and the Fuzziness of Slope Lower to 0.05
Distribution Pattern
Again this will control how the the rocks blend into the other nodes. Again, we want a texture to identify the "height" of the tiling rock texture.
- Make sure the Distribution Pattern section is highlighted in the top right.
- In the File Name field of the Image Properties section, browse to the matching heightmap or mask for your tiling rock texture.
- This example is using textures/megagen/temperate/rock_01_h.tga
- The Ramp Width should be set to a value much lower than the default of 1, since this causes a very blurry blend, which is not natural for rocks blending with dirt. Try a value of 0.1 here, then render a "Window" preview to see how the blending looks.
- Remember to set the Distribution Pattern Texture Scale to the same value as the Diffuse Scale, 32 32.
Local
Again we want the normal-map which matches the diffuse texture for the rocks.
- In the File Name field of the Local section, browse to the matching normal map for your tiling rock texture.
- This example is using textures/megagen/temperate/rock_01_local.tga
Surface Type
- Find the Surface Type Properties section of the property list.
- In the Type field, enter stone.
- Hit enter to accept the surface type.
Your rock textures should now produce correct "stone" effects when shot or collided with.
Preview again!
Now that the rocks are set up, you can hit the Render Preview (![]() ) button again and see what effect the new Rock node has.
) button again and see what effect the new Rock node has.
Further tweaks
There are other simple changes that can be done in the Terrain Editor to make your MegaTexture look even better.
Node order
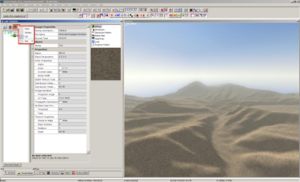
[Image:simplemega_node_order.png|frame|Click and drag a node to change the order]] You may notice, if you look carefully at the blends between the rock and grass nodes, that some areas of the MegaTexture appear to show the rock texture on top of the grass! This doesn't look very natural, and it's happening because of the node order.
Since the Rock node is below the Grass node, it will always be rendered on top of the grass. However, there is an easy way to fix this! In the node list of the Terrain Editor, you can click and drag any node to move it above or below existing nodes.
- LMB-drag the Rock node and move it up in the list until you see a black bar appear between the Dirt and Grass nodes, as shown on the right.
- Release LMB when you have positioned the node in the correct place.
- With the Rock node now positioned between the Dirt and Grass nodes, the grass will appear on top of the rocks as well as the dirt, which looks much more natural!
Color changes
Maybe your dirt texture is too bright? Or maybe your grass looks a little too green? You can easily fix this from the Terrain Editor itself! No need to create a new image every time you want to tweak the color or brightness, you can set this up on a per-node basis.
Let's say you want to make the dirt texture darker and a bit more red. Here's how you'd do it:
- Select your Dirt node.
- Look under the Color Properties area in the property list, and LMB on the Color swatch (next to where it says 1 1 1, which is white).
- A color wheel and brightness slider will pop up in a new window. You can use this to darken and tint your texture.
- Choose a darker brightness, and a color slightly towards red. I used RGB Values of 225, 220, 220.
- Hit OK to accept the color.
- Re-render your MegaTexture preview. You should notice that the dirt layer looks darker now!
Texture rotation
If you're building up a lot of layers of tiling textures, it can sometimes become obvious when a texture tiles in a particular direction. You may see repeating patterns extending into the distance when looking in particular directions, especially if all your nodes have the same orientation.
An easy way to overcome this is to play with the Template:Keyvname value in the Texture Properties section of the Terrain Editor's property list. For each node, you should also set the Template:Keyvname to match the Rotation value if you want your distribution patterns to line up and work correctly.
Render the MegaTexture
Save the Surface Tree
Once you're happy with how the preview looks in the editor, you should make sure that your final Surface Tree is saved. Either click the "Save and Unload" button in the Terrain Editor, or save the whole map.
Compile Only Entities
At this stage, your MegaTexture material is still technically "broken", since no .mega file exists yet. This means that if you try to compile the map, it'll take ages to process the terrain model, since it treats it as a regular model rather than the special case of terrain. Not only will this waste 5-10 minutes of your time, but it'll also produce a broken map.
However, we need to compile the map in order to tell the renderLight process which atmosphere to use when lighting the MegaTexture!
So the solution is to do an Only Entities compile. You can find this in the menu Compile -> 2 - Only Entities in editWorld. This should be done in a few seconds, and compiles all the information that renderLight needs.
Bear in mind that this compile process will not produce a playable map, so you will have to do a full recompile once the MegaTexture is fully rendered.
Run the SDK Launcher
Now that your .sft is saved, go through all the steps outlined in the Generate a MegaTexture tutorial.
That's it!
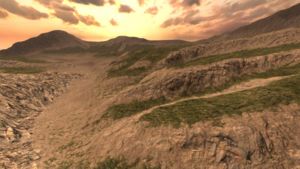
You've now created your very own MegaTexture to use in your map!
Before you even compile the map, you can get an accurate preview of how it will look in-game by pressing F6 to toggle "anim" mode while in editWorld's "RENDER" Camera view (toggled with F3).
Troubleshooting
If your terrain model still shows as red even after you've compiled the MegaTexture, there are a couple of things you should check first:
- See if the console gives you any warnings about missing .stm files. If this is the case, you probably forgot to assign any Surface Types to your texture nodes. Double-check them and make sure it's all set up correctly.
- Make sure there aren't any spelling mistakes or typos in your .mtr material file. The 2nd part of the material should have exactly the same name as your map (the < "mapname" > part described in this section), otherwise it will not be searching for the correct images.
- Make sure there aren't any spelling mistakes in your .rlt file (as described in this article). If any of the names are inconsistent, the Megatexture will not have been compiled fully.
If your map compile is taking ages (ie. over 2-3 minutes for a 32,000 triangle terrain model) then it's probably because the MegaTexture material is broken. Double-check the issues listed above, and make sure you have run the reloadDecls console command if you changed any .mtr or .rlt files.
If your .mega and .stm files definitely exist, in the right folders, try closing and re-opening the .world file in editWorld. This should load and display the MegaTexture properly.
See Also
- An Advanced Terrain and Megatexture - an advanced guide for complete MegaTexture creation
- Generate a MegaTexture - steps for generating a MegaTexture from the SDK launcher.
- Forum Thread - includes textures to download

