Brush Basics
Brushes (and patches) form the building blocks of level design, and are used to construct the buildings and structures used in every map.
Contents
Brushes
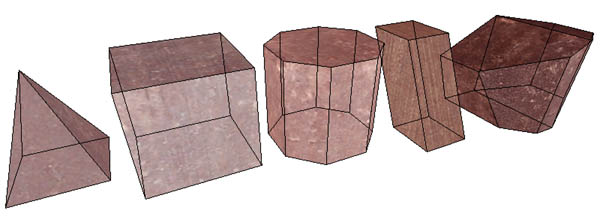
A brush is a convex 3D volume, consisting of 4 or more faces. Each face consists of a material and offset, specifying how they are rendered. The most basic of brushes is a cube, consisting of 6 faces and 8 vertices. These are usually created within the editor and then modified into the required shape.
Patches
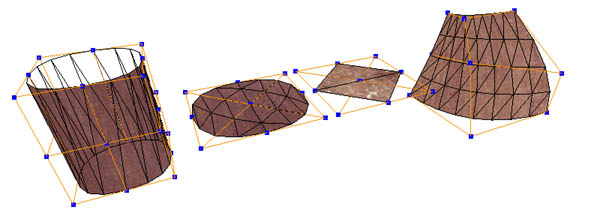
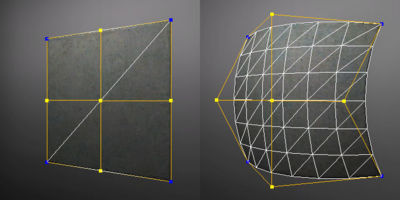
A patch is a flat, rectangular 3D plane that can be twisted, curved and contorted by moving any of its control points. Like brush faces, patch meshes are assigned materials to specify their appearance.
Patches are commonly used for cylinders/pipes, details and decals. in ETQW, arches, railings and ladders are often constructed from a number of patches.
The Grid
To scale the grid use numbers 1 to 9. Grid size is indicated at the bottom of the editor. For example pressing 4 will set the grid size to 8 units.
- Brushes should always be built to the grid as much as possible. This makes them easier to manage, manipulate and produces cleaner less error-prone map.
Creating and Editing Brushes
To create a brush, press LMB and drag on the grid to build a 6 sided brush to the desired size. The brush will automatically be selected and appear highlighted. To deselect the brush press esc. While selected the brush can be scaled by pressing the LMB outside of the brush in the 2D or 3D view and dragging towards or away from the brush.
- Press Q to show the size of the brush's bounds in the 2D view.
With the brush selected it is possible to change it's number of sides. From the Brush menu select the required number of sides or press CTRL + the number corresponding the the required number of sides.
To select a deselected brush hold SHIFT and press the LMB over the brush. Multiple brushes can be selected in the 3D view using Paint Select Mode or by pressing ALTLMB and dragging the selection box over the brushes you want to have selected. Repeating this while brushes are already selected will add brushes to the selection. The brushes must be completely contained within the bounds of the selection box to be selected.
To select a brush which is behind another brush in the 2D view press ALTSHIFTLMB over the brushes to cycle the selection until the desired brush is selected.
To move a brush press the LMB anywhere inside the brush and drag it in the required direction. With small brushes it is possible to mistakenly scale instead of move the brush. To
avoid this toggle move selection only by pressing W or pressing the icon. ![]()
Brushes can be rotated or mirrored using the Flip option in the Selection menu or using the icons. ![]()
To clone a brush press Space
To invert a selection press I.
- Vertex Editing: Press V to enter vertex editing mode for selected brushes. Multiple verticies can be drag selected in the same way that brushes are (as described above) or selected and moved by holding the LMB over them.
Note: Brushes must always remain convex. If a vertex is dragged in such a way as to create a concave object the brush will be reset when leaving vertex mode to it's initial shape prior to entering vertex editing mode.If a vertex is dragged to a position which causes the brush to become concave the problem will be indicated by yellow boxes around each vertex.
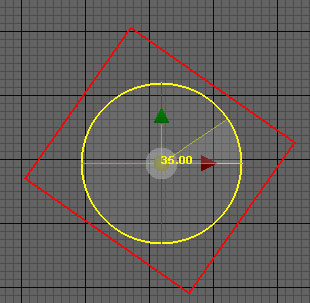
Brushes can be rotated in the 2D and 3D views using the rotate gizmo.
In the above example the selected brush has been rotated 35 degrees by selecting the outer ring of the gizmo and rotating it. It is possible to rotate by specified increments. This can be set in "Rotate" section of the Primitives Inspector. The origin of the rotate gizmo can be altered by dragging anywhere inside or outside of the gizmo or by dragging the white circle in the middle.
Creating and Editing Patches
Creation
To create a patch make a brush first, then go to the Patch menu and select desired shape (e.g. cylinder). This will create a patch in the same size and position of the brush.
Editing
You can manipulate patches in 2D or 3D window.
- By holding LMB inside the patch and dragging the cursor you move the patch (alternatively press w or
 icon).
 - By holding LMB outside the patch and dragging the cursor you resize the patch.
- To clone a patch press space.
- To rotate a patch with rotate gizmo press r.
- To mirror or rotate a patch use
 icons.
 - To increase the amount of rows/columns of control points go to Patch>Insert menu.
- To decrease the amount of rows/columns of control points go to Patch>Delete menu.
- To invert a patch press ctrl i or go to Patch>Matrix>Invert menu.
Subdivisons
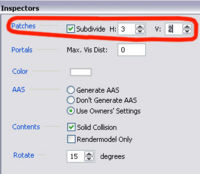
You can specify the amount of subdivisions each section of a patch should have: select the patch and go to the Primitives inspector. In patches section tick Subdivide box and type in the amount of horizontal and vertical subdivisions.
Vertex editing
To enter vertex editing mode select a patch you want to edit and press v.
There are two types of control points:
- Vertices are the corner points of the patch or to be more precise they are points where the polygon edges intersect.
- Interior control points are responsible for patch deformations. Manipulating them makes the surface of the patch convex or concave.
Collapsing interior control points
You can get rid of middle control points by selecting, moving and dropping them over vertices.
Now you have vertex-only controlled patch which in some cases is much easier to handle.
Texturing Brushes and Patches
Once a brush or patch is created it can be textured.
- See Texture Editor.
