Making a Terrain Model
Before building a detailed terrain mesh, make sure your gameplay layout works by using a more simplistic terrain model from Max, Maya or Lightwave, and jump to Getting The Terrain Mesh Into Game to test it in ETQW until you’re happy with the gameplay layout.
Contents
Terrain Model Methods
If you want to make a terrain mesh only using a standard 3d package, you can do so and skip down to Getting The Terrain Mesh Into Game.
If you do want to add some more natural detail to your terrain, here are the main steps for doing so:
- Build a basic layout in a 3d modelling package, for testing the gameplay layout.
- Convert the gameplay tested mesh to a Heightmap to use in World Machine.
- Add detail to terrain in World Machine (or other heightmap-based terrain editor).
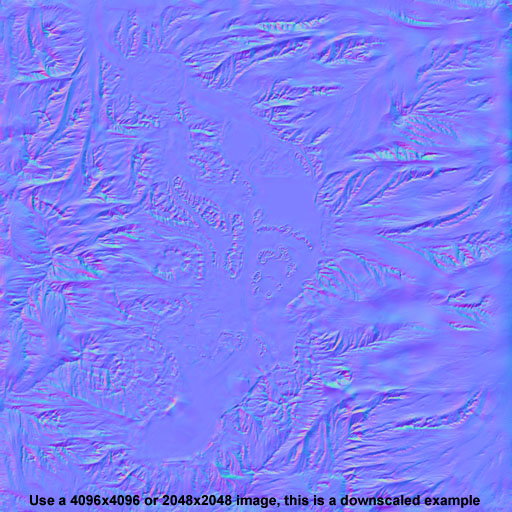
- Create a level perturbate image using the renderBumpFlat and heightToNormal commands.
If you want to get your hands even dirtier you can import the heightmap from World Machine into Mudbox or Zbrush and sculpt more detail.
Creating a Heightmap from a Model
This step is needed if you want to import your current terrain mesh into World Machine.
- Firstly, rotate the terrain mesh. In Lightwave, rotate -90° around the X axis. For 3ds Max & Maya, rotate +90° around the X axis.
- Cap any holes in the mesh, and triangulate. Using a machine with an nVidia graphics card, run the following command in the ETQW console to get the heightmap (where [model] is pointing to the relative path of the .lwo, .obj or .ase mesh):
RenderBumpFlat –floatHeightmap -size 2048 2048 [model]
- RenderBumpFlat will print out a value called "Height Difference", note down this number as you’ll need it later. An .r32 heightmap will be saved into the same folder as your model, and this heightmap can be used in World Machine.
World Machine
World Machine is a heightmap node based terrain editor, useful for creating a natural erosion look; here are a couple links to help you learn more about it, and get copy for yourself: World Machine / World Machine Blog
- The Erosion node is the main tool for creating natural-looking terrains, and contains many options to give a variety of results (try adding perlin noise to the heightmap before eroding).
- From the Erosion node, there are 3 extra outputs; Flow, Wear, and Deposition. These outputs are very handy for making distribution masks for the Megatexture. In order to use the 3 images you’ll have to convert them from top-down planar to UV-space via surface sampling in a 3d package.
- For areas that have been eroded so much that it has removed important gameplay geometry, you can use a Choose node that allows you to blend back the original heightmap using a mask.
- Export the heightmap as both a RAW 32 and 16 (image resolutions of 2048x2048 or higher are preferable), as some 3d packages don’t load 32-bit images. A standard TGA file will give a stepped result due to less height levels.
Optimising to Game Mesh
- First we need to convert the heightmap to a mesh. In both Mudbox and Zbrush you can do this by applying the heightmap as a displacement map on a 3d plane (512x512 tessellation should be enough). Also, World Machine Pro has mesh export capabilities.
- Once exported out, scale and move the new mesh so it matches up to your original gameplay tested mesh.
- The next step is to reduce the polygons to around 32K. Good results can be obtained using a Lightwave plug-in called qemLOSS3.
- Create a top down greyscale image that’ll represent the polygon distribution. White on the image would make the mesh dense while black will be less dense.
- In Lightwave rename the default material (Press Q to bring up the appropriate window).
- Apply the distribution map using Textured Point under the Map tab, setting VMap Type to Weighted Map, and giving it a name. Texture editor window will pop up, choose Projection: UV, select the UV map, and select your distribution map for the image.
- Set the viewport to Weight Shade and make sure the image's orientation is correct, orange should be in areas where you want dense polygons.
- Run the plug-in qemLOSS3 (plug-in is found under the Utilities tab). Enter in the number of polygons you want to reduce to (around 32K). Go to the WGHT tab, tick Use Weights as Reduction Constraint, and select the multiply value you want (exaggerates the effect of the weight map). Export back to your preferred 3d package (there may be edges that will need there triangulation flipped).
- This extra little step helps smooth out the mesh (re-distributing the polygons) if you’ve noticed your reduction has left sharp angular polygons. Smooth the mesh (one subdivision) keeping mesh border edges how they are. Run the subdivided mesh through the qemLOSS3 plug-in in lightwave again, this time not applying the weightmap distribution. The end result should leave a smoother mesh that’s better for gameplay.
- Small Lightwave tip: If you want to keep your UV’s, apply a texture to the mesh before exporting out of Lightwave.
UV the Terrain with minimal distortions
This process is written for Maya, other 3d packages might have to modify the process.
- To achieve relaxed UV borders use a mel script called worldSpaceUVLine - it can be found on Highend3D. Copy the .mel into your My Documents\maya\#.#\scripts folder and run by typing worldSpaceUVLine; in the Maya command line.
- Snap all 4 corners to the UV 0-1 square. Select all the edge uv for one side, and in the worldSpaceUVLine tool select the corresponding UV layout direction (U for horizontal, V for vertical), and press the align UV’s on selected line button. Repeat for each side.
- Make sure all holes in the mesh are capped, and run the Relax UVs tool, with the option Edge Weights set to World Space, and Pin UV Border selected. Keep repeating Relax UVs until you see no more UV movement.
Create Perturbate Image for Whole Megatexture.
This step will make a tangent-space normal map of the difference between your World Machine heightmap and your game mesh. This can then be applied to the Megatexture using the terrain editor.
- First rotate the terrain mesh (save as a different file to be safe). In Lightwave, rotate -90° around the X axis. For 3ds Max & Maya, rotate +90° around the X axis.
- We need to make a normal map of the game mesh in order to create the tangent space normal map. Cap any holes in the mesh, and triangulate. Using a machine with an nVidia graphics card, run the following line in the console to get the normal map of the game mesh:
renderBumpFlat –size <width height> [model]
- To get the Perturbate normal map, run heightToNormal in the console, using the normal map made in the step above, and the World Machine heightmap (which needs to be a 32-bit .R32 file):
heightToNormal -sourceIsNormal -s <scale> [normalmap] [heightmap]
Where <scale> = (image resolution) x (heightmap height) / (heightmap width)
- Convert the perturbate normal map to UV space. This is done using a surface sampler (Modify/Surface Sampler in Maya). Source being a planar-mapped mesh with the perturbate map applied, Destination mesh being the relaxed UV game mesh. Alternatively you can use the Warp Image tool in Maya using 2 UV sets, or if using 3dsmax, you can use the Render to Texture dialog to resample to correct UV space.
Getting The Terrain Mesh Into Game
Setting up Megatexture Material
- Set the terrain mesh material to megatextures/map_name
- Export the mesh as <map_name>.lwo to base/models/terrain
- Create a material for the Megatexture using the same name as above:
material megatextures/map_name { useTemplate megatextures/default_ambient < "map_name" > }
Or if using a specular map, create the material as below. The specular image should be named map_name_lit_spec.tga (resolution of 512x512) and copied into base/megatextures.
material megatextures/map_name { useTemplate megatextures/default_ambient_spec < "map_name" > }
Assign Terrain mesh for the Map
- Load your map (.world file) in World Editor, and bring up the Terrain Editor inspector.
- On the Root node set the model field to your model, and set the ST Model to a version of your mesh with no mesh holes (fill holes where you have cut out for buildings that go into the terrain).
- Compile the map in order to see it in game (the terrain will appear red if no Megatexture .mega file exists).
Out of Bounds (OOB) Geometry
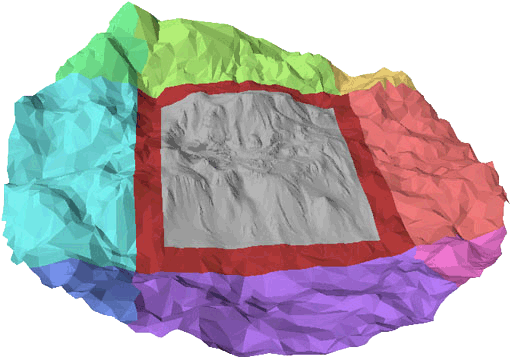
OOB geometry is the terrain outside the main area that gives the look of terrain extending to the horizon. The best way to build this is to have the Megatexture mirrored on the level/OOB border. This is so there are no obvious texture seams. A bit further out grab areas of terrain (like mountain peaks) from the gameplay mesh and merge those in, as this will keep the look of natural features in the oob. Also reduce the polygon count as the mesh gets further from the gameplay area.
Now we break up the mesh into sections:
The OOB Ring is a close mesh ring around the gameplay terrain (4096 units) that players can still run on, allowing an area of warning the player to turn back. This mesh should be placed in the level as a model_static, with the properties of:
mergecm                         1
model                           models/terrain/mapname_oob_ring.lwo
Outer OOB sections: The rest of the oob mesh should be broken into 4 to 8 sections circling the oob_ring. This helps the engine not draw sections that are out of the camera’s view. These models should be placed in the level as func_static entities, with the properties:
maxVisDist                      0
model                           models/terrain/mapname_oob_1.lwo
noclipmodel                     1
noscriptobject                  1
pushIntoConnectedOutsideAreas   1

