Difference between revisions of "Texture Editor"
(Batch update) |
m (→Finding a texture: The Media Inspector) |
||
| Line 9: | Line 9: | ||
* You can zoom in and out of the texture by dragging {{accelkey|shift}}{{accelbtn|rmb}} left and right. | * You can zoom in and out of the texture by dragging {{accelkey|shift}}{{accelbtn|rmb}} left and right. | ||
* The image in the texture preview window of the '''Media Inspector''' can be shifted by {{accelbtn|rmb}}-dragging. These can be useful when dealing with texture sheets which can be quite tall. | * The image in the texture preview window of the '''Media Inspector''' can be shifted by {{accelbtn|rmb}}-dragging. These can be useful when dealing with texture sheets which can be quite tall. | ||
| − | * If you know the name of the texture you want to use, typing | + | * If you know the name of the texture you want to use, typing its name in the filter will allow the inspector to show only materials with this text in it. |
{{clear}} | {{clear}} | ||
Latest revision as of 18:01, 21 November 2007
Finding a texture: The Media Inspector
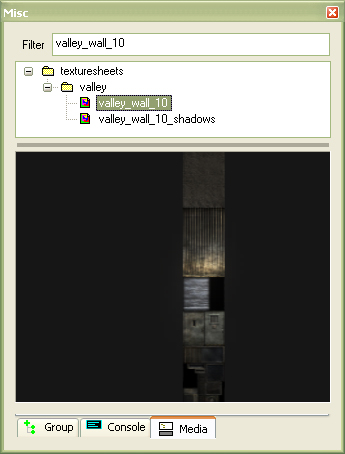
The first step in texturing a brush or patch mesh is to select a texture. In this example base\texturesheets\valley\valley_wall_10_ts_d is used. Textures are selected in the Media Inspector. Browse to the directory where the texture is stored and highlight it.
- Using the arrow keys you can step down through the available textures which will be displayed in the lit texure window of the Media Inspector.
- You can zoom in and out of the texture by dragging shiftrmb left and right.
- The image in the texture preview window of the Media Inspector can be shifted by rmb-dragging. These can be useful when dealing with texture sheets which can be quite tall.
- If you know the name of the texture you want to use, typing its name in the filter will allow the inspector to show only materials with this text in it.
Viewing a texture: The Textures Inspector
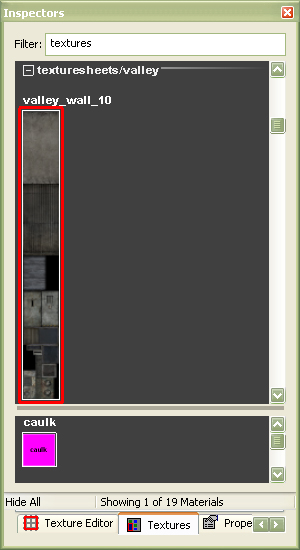
Selecting a texture in the Media Inspector places it in the Textures Inspector. From here it can be applied to a brush or patch mesh.
The Textures Inspector displays textures in a 2D view.
- Texture directories are indicated and can be collapsed by pressing it's name. This can be useful if there are a lot of textures used.
- The currently selected texture is highlighted with a red box.
- The 2Dtexture view can be scaled by pressing alt and rmb and moving the mouse left or right. This view can also be scrolled by holding 'rmb and moving the mouse up or down or using the mouse wheel.
- You can add often used textures such as Caulk to a favourites panel at the bottom of the Textures Inspector by pressing the rmb over the texture and selecting "Add to favourites" from the menu.
- If you know the name of the texture you want to use, typing it's name in the filter will allow the inspector to show only materials with this name
- It is possible to further filter textures by using the options in the "Materials" menu of editworld. From here you can Show/Hide all textures which have been selected in the Media Inspector, or show only those textures in use in the map.
- To view the material for a texture, press rmb over the texture and select "View material" from the menu.
To apply a texture, select the brush, face, or patch and highlight the required texture in the Textures Inspector.
Texturing using the Texture Editor
Once a texture is applied to the face of a brush it must be aligned to fit correctly to that face. This can be done numerically in the Surfaces Inspector (as with in previous versions of Radiant) by using the shift, fit, scale and rotate options.
- Note: if using the Surfaces Inspector for texturing it is useful to note that by activating any numerical field by highlighting it's value in the inspector, you can use the mouse wheel to shift, scale or rotate by the amount indicated.
When texturing objects with Texturesheets it is often the case that only part of that texture is required to be fitted exactly to a face. It is possible to do this using the Surfaces Inspector but it is much more convenient to use the Texture Editor Inspector.
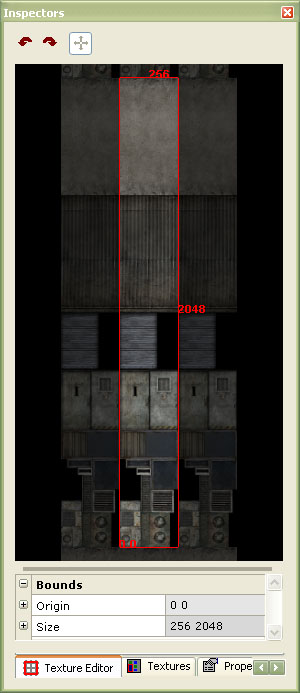
Once applied, the texture on a selected face appears in the Texture Editor Inspector. The region of the texture which will be applied to the selected face is highlighted by the red box. This is the texture region and it's size in game units is indicated in the texture view. Textures appear tiled in the texture view. In the centre, one instance of the texture is lit and surrounded by a white box.
The scale and position of the texture region can be altered either numerically in the bounds section (based around the origin of the red region box which is it's bottom left corner) or by using the mouse to scale/shift the texture region box in the texture window. It's important to note that this inspector is used to fit the texture to the face and is not an indication of the uv's of that face. So for example if you fit a texture using the Texture Editor Inspector and then shift it on the brush face using the Surfaces Inspector the texture region box will not update to indicate this. Double clicking in the red box will reset the texture region scale and position to that indicated by the red box.
- Note: The movement/scaling amount of the texture region is defined by the grid size. So for example, for very precise shifts or scales of the texture region use lower grid sizes. These can be changed using the number keys.


