Difference between revisions of "Terrain Editor"
(→Image Renderer) |
|||
| Line 138: | Line 138: | ||
** '''From Mesh''' Renders the node with the mesh UV’s (default). | ** '''From Mesh''' Renders the node with the mesh UV’s (default). | ||
** '''Parallel Top Down''' Planar projection from Top Down. | ** '''Parallel Top Down''' Planar projection from Top Down. | ||
| − | ** '''Parallel Side''' Planar projection from the side. | + | ** '''Parallel Side''' Planar projection from the side. For this to work correctly, your terrain mesh must be centered around the origin. |
=== Propagate Distribution === | === Propagate Distribution === | ||
Revision as of 10:58, 30 November 2007
This inspector tab in editworld is mainly used to build the texture layers of the megatexture. The Terrain Editor inspector is loceted in the menu under Window | Inspecors | Terrain. To activate the Terrain Editor click the ![]() button at the bottom of the inspector window. The terrain Editor works in a parent/child node based system, where nodes at the top of the list get drawn first and nodes further down get drawn last (opposite of photoshop layers).
button at the bottom of the inspector window. The terrain Editor works in a parent/child node based system, where nodes at the top of the list get drawn first and nodes further down get drawn last (opposite of photoshop layers).
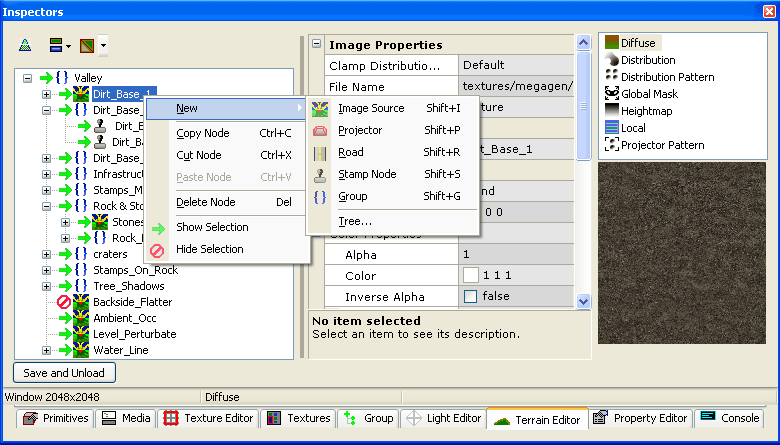
To create a node right click on the parent and under new you can select the different nodes: Image Source, Projector, Road, Stamp Node, and Group. In the right click menu you can also copy/paste nodes and delete them. To move a node click and drag, releasing on a node that you wish to be it’s new parent (it will by default make it bottom of the child list). Alternatively you can release the node either just above or below a node, placing it respectively. To hide nodes click on the green arrow (next to the node) so it turns into a red circle with a slash, click again to un-hide. When hidden a node wont render in the megatexture.
Contents
Root Node
At the top of the node hierarchy, this node must be created first.
- Detail Texture 0-3 Choose the texture for each of the 4 Detail Texture slots.
- Model Assign a terrain model to be compiled into the map.
- ST Model Assign a model to be used for calculating the megatexture ST grid (information used to focus the megatexture around the player). This mesh should be the same as the gameplay mesh, only with all holes filled up (there should be no gaps in the mesh).
Group Node
This node is useful for keeping your tree nice and tidy, and does what its name suggests.
Image Source Node
Used to apply textures and can be distributed in a variety of ways.
Image Properties
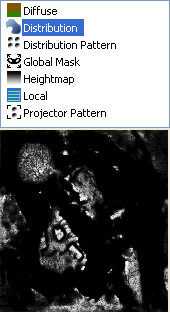
Images and procedurals can be assigned to the different inputs using the top right section of the Terrain Editor tab.
- Diffuse The colour image to be used in the blend.
- Distribution The distribution image for the whole mesh, where white will blend the image and black will mask the image. This layer uses the uv’s of the mesh, unless UV Type has been set to either Parallel projection settings, where the distribution will be projected in the same manner.
- Distribution Pattern This image allows you to add more detail to the Distribution image blend. It allows you to make a mask texture that tiles with the diffuse texture, so sections (like stones) can blend in before other areas. White areas on this images will blend through before black areas.
- Global Mask This image is multiplied on top of the Distribution mask. Useful when wanting to use complex mix of 2 masks in a node. For example you’ve made a mask for where you want rock, but you want to mask that mask for different angles on the mesh (avoiding upside down rock).
- Heightmap Used to set a heightmap of a layer for when it or another layer uses a HeightMap Blend.
- Local The normal map to be used in conjunction with the diffuse image (uses the same scale and rotation settings)
- Proj. Pattern Used when UV Type is set to a parallel projection. Works in the same way as Distribution Pattern, except is projected parallel with the diffuse image (and uses the same scale settings).
To assign an image, select the image type (Diffuse, Distribution Pattern…) and under Image Properties/Source Type (on the left side of the tab) choose the type of image you would like (texture or procedural). With each type, different settings can be entered:
Texture
- Clamp Distribution Here you can set if an image tiles or is clamped. Normally can be left to default, as by default the image node is set to tile and a projector node is set to clamp.
- File Type Choose a texture/image you wish to use. In the Choose an image pop-up, you can add a favourite folder by dragging it into the favourites section. Double click the favourite to enter that folder, and while selected press delete to remove it from the list.
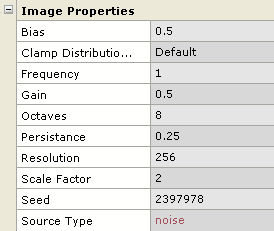
Noise, Rocky, and Marble
Contain standard procedural settings
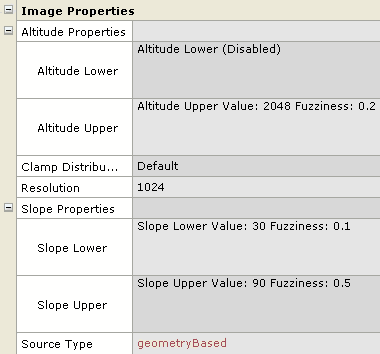
Geometry Based
Builds an image created from terrain attributes, useful for masks (snow caps, rocky cliffs).
- Altitude Properties Contains settings to mask based on geometry height (Altitude Lower and Upper). To activate an altitude select and tick Enable.
- Value Assigns a height at which to start the mask (standard editor units).
- Fuzziness The higher the number the smoother/longer the fade in.
- Resolution Assign a texture (sample) resolution to the procedural image. When rendering the megatexture a mask will be automatically made at this resolution.
- Slope Properties Contains settings to mask based on geometry angle (Slope Lower and Upper). To activate an altitude select and tick Enable.
- Value Assigns an angle at which to start the mask.
- Fuzziness The higher the number the smoother/longer the fade in.
Properties
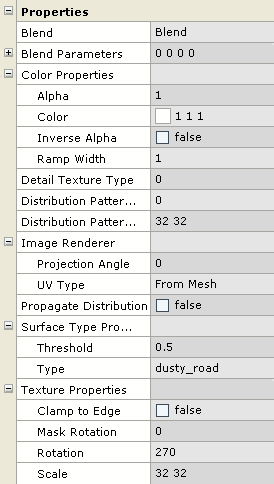
Contains the settings/values on how to blend the images and nodes together.
Blend
Here you can choose how you want this node to blend with the previous layers:
- Add Brightens the previous layers using the image on this node. Note that masks don’t work with this blend mode
- Multiply (d*(s*1.6)) In the source image colours darker than 160 will darken the previous layers, while colours brighter than 160 will lighten.
- Multiply (d*s) Darkens the previous layers by using the image in this node.
- Heightmap The way this blend method works is it renders all the heightmaps from each of the layers first, and then blends the diffuse & local images into the lower parts of the heightmap (darker parts).
- The best way to use this mode is to set the heightmaps of the other layers, and on this layer set the heightmap to black. Using the Distribution mask, the black (low height) will be distributed roughly in the areas you want this layer to appear. Adjusting the first 2 values in blend parameters, this layer will blend into the heightmap crevasses.
- Due to the heightmaps being rendered together at the start of the process, this method becomes harder to use more than once, as the low points of the heightmap will always remain the same. Because of this, using the Distribution Pattern as a heightmap instead usually gives better results.
- Perturbate Normals This blend method will add the local image onto the previous layers normals. Useful for adding detailed normals from a higher-res terrain. Note the diffuse image is not rendered but all other layers work fine.
Blend Parameters
- Parm 0 Used in a heightmap blend, this value controls the height as which the blend takes place.
- Parm 1 Used in a heightmap blend, this value controls the sharpness of the falloff in the blend.
- Parm 2 Not used for anything.
- Parm 3 Used to adjust the falloff sharpness when using UV Type set to Parallel (Top Down or Side).
Color Properties
- Alpha Transparency of the layer (white is opaque).
- Color You can tint a layer by choosing a colour here.
- Inverse Alpha Inverts where the layer is rendered.
- Ramp Width Controls the sharpness of the falloff (1 is wide, 0 is sharp).
Detail Texture Type
Sets what detail texture from 0 to 3 to use. Detail textures are defined in the Root node.
Distribution Pattern Texture Rotation
Sets the Rotation of the Distribution Pattern (positive numbers give counter clockwise rotation).
Distribution Pattern Texture Scale
Sets how many times the Distribution Pattern tiles.
Image Renderer
This section is used to set the image node to render as a side or top projection.
- Projection Angle Used when UV type is set to Parallel Side, it allows you to change the direction at which the side projection takes place. In order to make sure the normals aren’t flipped, check that you aren’t projecting from the opposite side.
- UV Type' Sets what UV method to use, Mesh UV’s or Planar Projection.
- From Mesh Renders the node with the mesh UV’s (default).
- Parallel Top Down Planar projection from Top Down.
- Parallel Side Planar projection from the side. For this to work correctly, your terrain mesh must be centered around the origin.
Propagate Distribution
If set to true the mask of this Node will mask the children nodes also.
Surface Type Properties
Surface Type sets what footstep and impact effects to use.
- Threshold Allows a Surface Type of a Node to blend in sooner (stronger) if set above 0.5, or weaker below 0.5. By default it's at 0.5 and usually does not need to be changed.
- Type Sets what the Surface Type is: carpet, concrete, dirt, dusty_road, flesh, forcefeild, glass, grass, gravel, ice, leaves, liquid, metal, metal_thick, moss, mud, paper, pavement, pine, plastic, sand, snow, stone, water, water_interior, wood, wood_thick.
Texture Properties
- Clamp To Edge If set to true the edge pixels will repeat and the image wont tile. Mainly used for a large image that will cover the whole map, and you don't want the edge pixels to blend through to the other side.
- Mask Rotation Sets the Rotation of the Distribution image (positive numbers give counter clockwise rotation).
- Rotation Sets the Rotation of the Diffuse image (positive numbers give counter clockwise rotation).
- Scale Sets how many times the Diffuse image tiles.
Projector Node
This node projects an image from a positional plane onto the terrain mesh (megatexture). Most of the settings from the Image Source Node work the same way, except that there is an extra section called Projector. By pressing v (vertex edit mode) you can modify the projector into a different shape.
Projector
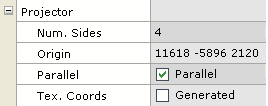
- Num Sides Usually leave as default, don't set it to 2 or below. When increasing the number of sides, use the vertex edit mode (v) to move the extra vertex out.
- Origin Sets the center of the projector, usually best to move the projector in the editor than to type in a value.
- Parallel Buggy at the moment, leave as Parallel.
- Tex. Coords Sets what UV's to use when projecting.
- Generated Uses projected UV's
- From Model Uses mesh UV's for Diffuse and Local, and uses the Projected UV's for just the mask (Distribution).
Road Node
Allows you to create a road that is positioned by a curve.
roadTemplate
First you would need to make a roadTemplate, this sets what textures should be used along the road. Create your roadTemplate (<map_name>.rtl) in this folder base/megagen/roadtemplates. You can place more than one roadTemplate in a .rtl file. Here is an example of a road template:
   roadTemplate main_road {
       {
           diffuse image sdTextureTGA_Properties {
               name "textures/roadtemplates/main_road.tga"
           }
           local image sdTextureTGA_Properties {
               name "textures/roadtemplates/main_road_local.tga"
           }
           distribution image sdTextureTGA_Properties {
               name "textures/roadtemplates/main_road_mask.tga"
           }
           offset ( -1 1 )
           surfaceType "pavement"
           detailtexture "textures/detail/gravel.tga"
           uvType following
           texscale ( 1 1)
           texRotation 0
       }
   }
- diffuse Diffuse image source
- local Local map image source
- distribution Distribution mask image source
- offset Allows you to offset the texture from the edges. Example: offset ( -0.85 0.85 ) will map the texture inside the width of the Road Tool (defaults to -1 1)
- surfacetype Sets what the Surface Type is: carpet, concrete, dirt, dusty_road, flesh, forcefeild, glass, grass, gravel, ice, leaves, liquid, metal, metal_thick, moss, mud, paper, pavement, pine, plastic, sand, snow, stone, water, water_interior, wood, wood_thick.
- detailtexture Sets which Detail Texture to use on the road. As you can only use a total of 4 detail textures per megatexture, you should make sure that the detail texture used in the roadTemplate, is also assigned in the Root Node.
- uvType Texture coordinate generation method, choose from 'following' or 'tiling' (defaults to following)
- texScale Scales the texture in the X & Y axis, only used in combination with tiling texture coordinates (defaults to 1 1)
- texRotation Rotates the texture, only used in combination with tiling texture coordinates (defaults to 0 degrees)
Assign the roadTemplate to the Road Node
In the Road Node properties:
- Road Template Set the roadTemplate you'd like to use for the road. The roadTemplate sets what texture to use.
Creating the Road Curve
To start placing a road:
- select the node
- click on the XY Top window
- enter vertex editing mode (v)
- hold CtrlShift and lmb in the XY Top window to start placing the points that make up the road curve.
Modifying the Road
To modify the Road Tool you need to be in vertex editing mode (v) if you aren't already, press Esc to exit vertex editing mode.
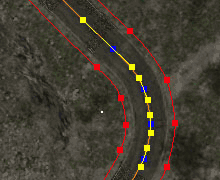
- Moving Road Points click and drag the blue points.
- Change Points Direction click and drag the yellow points.
- Change Width of Road click and drag out the red points. Alternatively you can widen the whole road when outside the vertex editing mode by selecting the Road node, then click and drag beside the road.
- Adding new Points hold Ctrl Shift and Left Click the area where you want create the new point.
- Deleting Points click and hold the blue point you want to delete and press Backspace.
Stamping and the Stamp Node
Stamping allows you to place images (like decals) that will be rendered onto the megatexture. Stamping is a good way to add details like scuff marks from human traffic, tyre skid marks, oil stains, and so on.
4-Channel MegaTextures
Stamping is only possible on 4-channel MegaTextures so you will need to use a specially-compiled version without baked lighting. A 4 channel Megatexture has a (sun angle dot product) normal map in the alpha channel to calculate lighting.
- To create a 4-Channel Megatexture, un-unchecked the Bake lighting and Bake ambient buttons in the RenderLight MegaBuild options. 4-Channel Megatextures also come out much larger so you should to turn up the compression of the megatexture (start with Luminance Error 30, Chrominance Error 40, Alpha Error 50). Rendering a 4-Chanel Megatexture will write over your 3-Channel Megatexture, so you may want to back up you 3-Channel .mega.
- You will also need to set up your MegaTexture material to use at a 4-channel shader to match the .mega file, set up like this:
material megatextures/mapname { useTemplate megatextures/default< "mapname" > }
- If your material is set to a 3-Channel material (eg. one that uses any default_ambient template), then it will not show up during stamping. Instead it will appear as solid white/red/black. If this happens, double-check your material and .mega to make sure they are 4-Channel.
Placing stamps in the Game, editStamp
- Stamp files tend to eat up graphics memory so to help reduce the amount that the other game textures take up you should reduce your picmip settings before loading the level (put back to default or previous settings when you're finished stamping).
Set in the Console:
image_globalpicMip -4
image_picmipEnable 1
- If you don't have megastamp.cfg in your base/ folder you can grab it here.
- Run the map you wish to stamp in.
- Execute the stamp control config: exec megastamp.cfg
- This will automatically set r_orderIndexes 0, which speeds up the game when editing stamps.
- It will also automatically launch editStamps (the console command for the stamp placement tool).
- editStamps starts up with no stamps loaded by default. Open a set of stamps by using File -> Load Stamps.
- When you save your placed stamps, save your .megastamp file to base/megagen/megastamps/, for you to assign in the Stamp Node.
Default Editing Keys
Open 'base/megastamp.cfg' and you will see the default keys bound for use in editStamps. The .cfg file is commented into sections, so you should be able to easily copy and change out sections into your own personal .cfg file. Here is a summary of most of the main shortcuts:
- Press h or MMB to select the area of the Megatexture where you wish to stamp. Once stamping is complete inside the square, move the cursor to another location and press H or MMB again to 'respot' a new area.
- LMB to apply a stamp to the megatexture. Holding down CTRL while clicking will use only the normal map, holding ALT while clicking will use only the diffuse.
- RMB to apply a stamp to the megatexture and then automatically rotate the next stamp to a random angle. This can be useful for organic stamps such as dirt. Again, hold CTRL while clicking to use only the normal map, hold ALT while clicking to use only the diffuse.
- mouse wheel to scale the stamp up or down. The value in the .cfg can be increased or decreased to alter the amount the stamp scales on each step.
- Use CTRLmouse wheel to rotate the current stamp in 5 degree increments. The value in the .cfg (defaults to 5 and -5) can be increased or decreased to alter the amount the stamp rotates on each step.
- Holding down SHIFT and scrolling the wheel will rotate the stamp in 1 degree increments, which should be useful for precise alignment.
- Holding down ALT and scrolling will rotate the stamp in 90 degree increments. This should be useful for aligning stamps to building edges quickly. Mouse4 and Mouse5 (the forward/back buttons on the side of most new mice) will work for this too.
- Press R to reset the current stamp's rotation - it will now be aligned to the world grid (useful for exactly matching the edges of brushwork or models on the grid).
- Press CTRLZ to undo any changes. Keypad Minus will also Undo changes.
- Press CTRLY to redo any changes. Keypad Plus will also Redo changes.
- Press CTRLS to save the current .megastamp file.
- You should use File -> Save from the editStamps menu when you first start working on an area so you can choose an appropriate file and folder name. Once this has been done, CTRLS will save as the correct file name.
- Press N to hide the stamp preview image. Pressing N a second time will bring the preview image back again.
- Press M to hide brushwork and models in the map (excluding objective entities and areas). Pressing M a second time will show brushwork and models again.
- Press B to hide the "STUFF" system. Pressing B a second time will show STUFF again.
- Press X to toggle between four speeds of camera movement.
- Press P to load a GDF player model for scale reference.
- Pressing P again will move the model to your current location.
- Pressing SHIFTP will remove the model completely.
- Press F to reload decls (to refresh .stamp file texture lists).
- Press Backspace to erase stamp work. The eraser is in the shape of the stamp you have selected (note this does not physically delete a placed stamp, but mask away what has already been placed).
stampMaterial
stampMaterial libraries are text files with the *.stamp extension. These comprise of a number of stamp materials, and is what editStamps loads. The material syntax is quite straightforward, here is an example showing the file structure, and the naming conventions that should be used:
 stampMaterial mapname/surfacegroup/surface_description_01 {
       surfaceType "concrete"
       surfaceTypeThreshold 0.5
       detailtexture "textures/megagen/detail/detailimage.tga"

       diffuse image sdTextureTGA_Properties {
             name "textures2/megagen/mapname/surfacetype/surface_description_01_d.tga"
       }
       local image sdTextureTGA_Properties {
             name "textures2/megagen/mapname/surfacetype/surface_description_01_local.tga"
       }
       cover image sdTextureTGA_Properties {
             name "textures2/megagen/mapname/surfacetype/surface_description_01_mask.tga"
       }
 }
- As you can only use 4 detail texture per megatexture, make sure the detail texture used in the roadTemplate, is also assigned in the Root Node.
- You can assign specific surface types to a stamp by altering the "surfaceType" setting in the .stamp file. Use any of the standard surface types like you would in a regular material.
- The surfacetype threshold value denotes when the surfacetype will become used, ie. if set above 0.5 the sufacetype will blend in sooner , or below 0.5 it will blend in weaker . By default it's at 0.5 and usually doesn't need changing.
- Ideally, you should have no more than 8 to 10 stamps in 'editstamps' at one time as you will run out of memory quickly. So try and group them in themed areas like tarmac, rock, dirt and so on.
- You do not need to use the ReloadImages command to refresh stamp images - stamps which have been placed on the Megatexture will automatically update whenever you "respot" the edit area (defaults to MMB or H).
- ReloadDecls will update any information contained in .stamp files. Use this if you have altered your material paths or added stamps to a .stamp library (default key is F).
MegaStamp Files
Megastamp files (.megastamp) are what editStamps saves out so you can assign the placed stamps in Editworld's Terrain Editor via a Stamp Node.
- Megastamp files are by default saved to the base/maps directory, called <mapname>.megastamp. However, if you use File -> Save As from the editStamps window before you start stamping, you can save the .megastamp file as a specific name.
- Stamp only in one specific area at a time. This will make it easier if you need to restamp sections, as you cannot delete stamps that have been placed in a .megastamp without manual text editing the .megastamp.
Assign the megaStamp to the Stamp Node
In the Stamp Node properties:
- Stamp File Set the magaStamp file (.megastamp) that was created when you placed the stamps on the megatexture.
Megatexture Preview
This is a useful tool preview your megatexture, at either lowres over the whole map, or full res in localized areas.
Diffuse and Local
Second button along the top of the Terrain Editor inspector, you can choose between 3 settings:
- Diffuse Renders the diffuse only.
- Local Renders the local (normal) images only.
- Diffuse + Local Renders both the diffuse and local images. If you press F3 (Render Mode) in the viewport, the preview will render with the atmosphere lighting (not very accurate to final results).
Render Terrain Preview
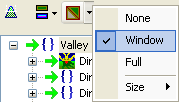
Pressing the third button along the top of the Terrain Editor inspector will render the preview ![]() . To select what area to render, click on the arrow drop-down joined to the render button:
. To select what area to render, click on the arrow drop-down joined to the render button:
- None Disables the render button (set by default).
- Window Renders a 2048x2048 square at full resolution. The square will start centered in the middle of the map, and you just click and drag to move it. The UV's of the window preview will not line up exactly, but the Full render will.
- Full Renders a 2048x2048 preview of the whole terrain.
It's usually best to hide stamp nodes when previewing the megatexture, as it will slow down the render (by a lot). To hide nodes click on the green arrow (next to the node) so it turns into a red circle with a slash.
Detail Textures
Detail are higher resolution textures that tile over the megatexture. You can assign 4 detail textures per megatexture, by setting them in the Root Node. When using the Road and Stamp Nodes, make sure to only use detail textures that are assigned in the Root Node.
Detail Textures need to be a greyscale 512x512 texture (preferably saved in base/textures/detail/).
Compile Detail Textures
To compile your detail textures, run megagen in the console:
megagen -notex -dtm <mapname>
If you receive warning of more than 4 details textures, check your roadTemplates and Stamps.
Then copy from your base/maps folder the <mapname>_detail.tga and <mapname>_detailmask.tga to your base/megatextures folder.
Surface Type
Surface Type (.sft) sets what footstep and impact effects to use.
Here is a list of Surface Types you can use: carpet, concrete, dirt, dusty_road, flesh, forcefeild, glass, grass, gravel, ice, leaves, liquid, metal, metal_thick, moss, mud, paper, pavement, pine, plastic, sand, snow, stone, water, water_interior, wood, wood_thick.
Compile Surface Types
To compile your surface type information, run megagen in the console:
megagen -notex -stm <mapname>
This will create <mapname>.stm in you base/maps folder.
Check .sft for Errors
If you want to check your sft for errors, run it through ExpandSTM.exe by dragging the <mapname>.sft over the exe (in explorer) and releasing.
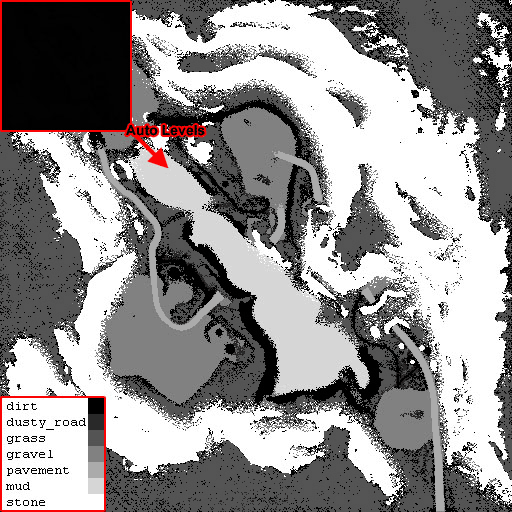
This will create <mapname>.txt (surfacetype list), <mapname>_color.tga (megatexture preview) and <mapname>_map.tga (surface type distribution).
Load the <mapname>_map.tga and auto adjust the levels (colours), so you can see the surface type steps. To see if your .sft compiled correctly, make sure the listed materials in <mapname>.txt line up with the shade steps in <mapname>_map.tga. The further down the surface type list (<mapname>.txt), the lighter the surface type will be on the <mapname>_map.tga image.
