Difference between revisions of "Making A Normal Map"
m (What's next) |
m (Added to Tutorials category) |
||
| Line 99: | Line 99: | ||
[[Category:Models]] | [[Category:Models]] | ||
[[Category:Art]] | [[Category:Art]] | ||
| + | [[Category:Tutorials]] | ||
</noinclude> | </noinclude> | ||
Revision as of 13:23, 5 November 2007
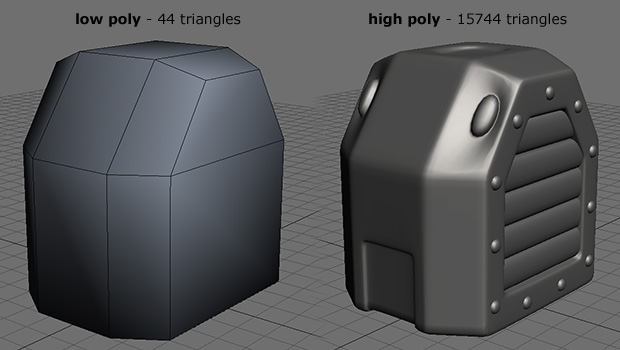
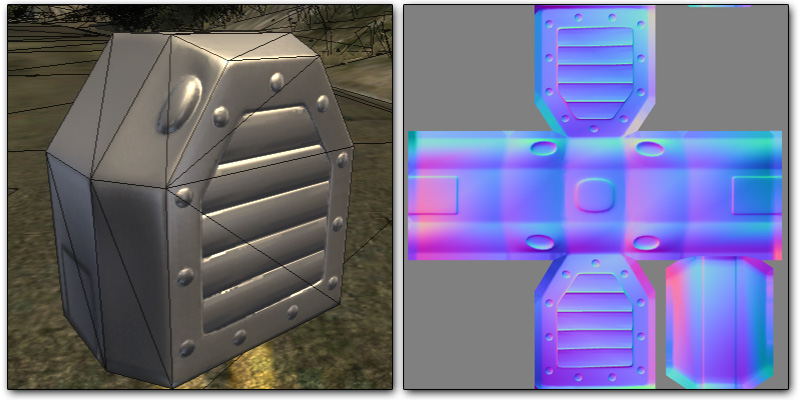
This tutorial will go through all the steps for easily creating a normal-map from a high-poly model using ETQW's renderBump tool. I'm going to be making an amazing box to be used as a mapobject!
If at any stage in this tutorial, you find your models or materials are not working, make sure you have read and understood fully what has been explained here, especially the "notes" in each section.
Contents
What You Will Need
One high-poly model
- Created using subdivision surfaces or ZBrush, for example.
- This model does not need UV-maps or textures.
One low-poly model
- The model that will be displayed in the game with the resulting normal-map.
- This model requires UV-maps, and a named material applied to it in your 3D package.
A material for your low-poly model
- This will contain the settings used to generate the normal-map.
- Materials are stored in .mtr files in the base/materials folder. Always put your material declarations somewhere in this folder or else they may not be loaded.
ETQW!
- The game contains the tools for extracting normal information from your high-poly model and baking it to a texture.
Export The Models
Firstly you need to export both your high-poly and low-poly meshes into a model format that ETQW can read. This could be .LWO, .OBJ or .ASE. Your high-poly model does not need any textures or materials (if it does, they will be ignored), but your low-poly model needs to be UV-mapped, and it needs a material applied to it.
In LightWave you can set the material name in the Surface Editor, in 3ds Max you can set the material name in the Material Editor and in Maya you can set the material name in Hypershade.
I'm going to export my models like so:
- Low-poly: models/mapobjects/boxes/box01.obj
- High-poly: models/mapobjects/boxes/box01_high.obj
It makes sense to have your material named accordingly - in this case my material is called boxes/box01.
Note for .OBJ Format
If you're using .OBJ format, be aware that the model's materials need to have their slashes ( / ) replaced with double underscores ( __ ) or else the game will not load the model correctly. In this case, I need to replace boxes/box01 with boxes__box01 in 3ds Max's material editor. This is only required in the 3d modelling package, the .mtr file should stay as described below.
Set Up The Material
Make a New Material Declaration
You will need to either create a new .mtr file for your material, or add your own material declaration to an existing .mtr file. The material declaration name will need to match up with the material name assigned to the low-poly mesh (however the .mtr file can be named anything you want). I'm going to make a new file called boxes.mtr which you can download here. This is what it contains:
material boxes/box01
{
	renderbump -size 512 512 -aa 1 -trace 0.01 models/mapobjects/boxes/box01_local.tga models/mapobjects/boxes/box01_high.obj
	{
		diffusemap	models/mapobjects/boxes/box01_d.tga
		bumpmap		models/mapobjects/boxes/box01_local.tga
		specularmap	models/mapobjects/boxes/box01_s.tga
	}
}
The important line for us here is the one beginning with renderbump. This section of the material is required before you can use the renderBump command in game, and provides several settings:
- renderbump - this tells the game that the models using this material will be used to generate a normal-map.
- -size 512 512 - this sets the size of the texture output in pixels (so you could use -size 256 1024, etc.).
- -aa 1 - this is the antialiasing setting. 1 means that the image will be antialiased 4 times, which will give you a cleaner, less "jaggy" normal-map. For very detailed models, it's worth setting this to 0 during testing, since it speeds up the renderBump process considerably. Setting this to 2 will produce the best results, but take the longest. I would advise only using a value of 2 when you're sure that all your other settings are correct.
- -trace 0.01 - this is the distance that renderBump will cast rays from the lowpoly object, represented as a fraction of the object's overall size. If you find that not all of your high-poly geometry is being captured in your normal-map, try increasing this value so that the rays cast further.
- models/mapobjects/boxes/box01_local.tga - this is the path to the normal-map you want to save.
- models/mapobjects/boxes/box01_high.obj - this is the path to the high-poly mesh you want to capture detail from.
There are many more settings that you can use for renderBump, they are all covered in the full article here. However, many of them are only needed in very technical situations, and most of the time you probably won't need any more than is described above.
Important!
ETQW will only load materials that are fully correct. If there are any missing images or incorrect code, the material will not be loaded and you will not be able to renderBump your models. In this case, you will need to make sure that box01_d.tga, box01_local.tga and box01_s.tga all exist in the correct folder. If you don't want to create temporary images, you can replace all of these images in the material with _black, which is a default pure black image. Obviously you will need to change this before you can preview your models correctly, so I'd recommend just setting up some quick test images.
Additional Note
If you create a new .mtr file while ETQW is running, the game will not reload it, even if you use the reloaddecls command. You should make any new files before running the game. This is not a problem if you add your own material to an existing .mtr file.
Get RenderBumping!
Now you have your models and material set up, you can launch ETQW. All you need to do is pull down the console and type this commandline:
renderbump models/mapobjects/boxes/box01.obj
You should now see ETQW list various technical details about the models it's loading, and then the window should turn into a large progress bar moving along the bottom of the screen. This means the renderBump process is working on your models. Be patient, this process can take several minutes! The higher-resolution your texture, and the higher-poly your models, the longer the process will take.
When it's finished, you can go into your models/mapobjects/boxes folder and you should see box01_local.tga - open this up and you should see your normal-map!
Test The Output
If your material is set up correctly, you should be able to use the testmodel command to load your lowpoly model with the new normal-map. First you will need to load a map to test the object in (for example, type devmap valley in the console to load Valley). Once the map is loaded, you can type this command into the console:
testmodel models/mapobjects/boxes/box01.obj
This will spawn your model at the current player location.
Other Useful Commands
Now that your model has been loaded and displayed in the game, there are a number of commands which may be useful.
- reloadimages - typing this into the console will reload any textures which have changed. If your normal-map isn't being displayed, run this command to make sure that the up-to-date image is loaded rather than any placeholder images you might have created earlier.
- reloadmodels - similar to the reloadimages command, but this one will reload any models in the scene which have changed. Use this if you alter your model and want to see the updates in-game.
- g_testmodelrotate 5 - if you use this command in the console, it will spin any models spawned with the testmodel command around, so you can look at all sides without moving your view. Changing the value will change the speed of rotation.
- toggle r_showtris - typing this command into the console will enable or disable a wireframe overlay of all triangle edges in the scene. You can use r_triscolor to change the colour and transparency of the wireframes.
What's Next?
Now you are ready to texture your model, using your normal-map as a starting point! Click here to move on to that tutorial!

