Generate a MegaTexture
The ETQW SDK Launcher includes all the settings required to generate a MegaTexture. It includes options for MegaGen (to render the raw texture tiles), Renderlight (to bake lighting info into the tiles) and MakeMegaTexture (which compiles the tiles into a compressed .mega file). It's a one-stop shop for compiling MegaTextures!
Each section contains a "View Command Line" button, which will output a set of options for each process. You can add these to a command line of ETQW.exe in a .bat file if you need to automate your MegaTexture compiles.
Contents
Using the tools
Paths setup
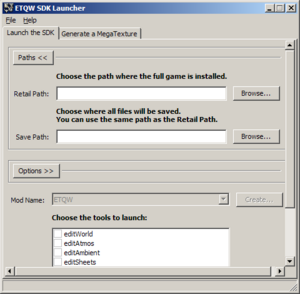
Firstly you need to select a valid game path, and a valid save path in the main "Launch the SDK" tab. If you have already set this up to work with your custom maps and mods, you shouldn't have to change anything here.
Just make sure you have the correct "Save Path" and "Mod Name" which contain your custom terrains, textures and maps selected.
Generate a MegaTexture
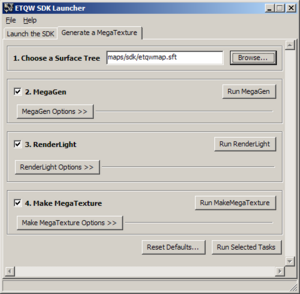
To access the MegaTexture generation tools, run the ETQW SDK Launcher, and go to the "Generate a MegaTexture" tab.
Load a Surface Tree
Now you will need to load a Surface Tree (.sft) file which contains the texture and surface information you want to render into your MegaTexture. Surface Trees are generated automatically by EditWorld from the Terrain Editor. Do not edit .sft files manually, or you may lose your changes whenever the map is saved!
- Click the "Browse..." button next to the "1. Choose a Surface Tree" field.
- Browse to your save path's /maps/ folder and select your <span style="padding: 0 0.5ex; background: #def;" title="A file or folder named '<mapname>.sft'"><mapname>.sft file.
Create a RenderLight Template
Before you can compile a full MegaTexture, you will need to create a .rlt template. You can find examples of these in base/renderlight/. You can create one by making a blank .txt file and renaming the extension to .rlt.
A RenderLight template looks like this:
{
	mesh		"models/terrain/<mapname>.lwo"
	diffuse		"maps/<mapname>_d.tga"
	bump		"maps/<mapname>_local.tga"
	out		"megatextures/<mapname>_lit.tga"
	map 		"maps/<mapname>.entities"
	atmosphere	"<atmosphere name>"
}
- mesh - this should point to the relative path of your terrain model.
- diffuse - this is the path to the output diffuse texture tiles from the MegaGen stage.
- bump - this is the path to the output local normal-map texture tiles from the MegaGen stage.
- out - this is where RenderLight will output the lit texture tiles.
- map - this is the path to your map's .entities file, which is created when the map is compiled. RenderLight should read the atmosphere information from this file. If Renderlight is giving warnings about missing atmospheres, make sure your map has an atmosphere entity, and has been compiled successfully.
- atmosphere - specify a different atmosphere name here if you don't want your MegaTexture to be lit using the same light setup as the main map (for example, snow textures tend to get way too bright when lit, so you should make a duplicate of your map's atmosphere with a sunlight color half as bright).
Important notes
- You must have fully compiled your map successfully at least once before these processes will work.
- Your map's terrain model must have a "MegaTexture material" applied to it, and must be UV-mapped inside the 0-1 range. If you are unsure of how to do these steps, read through the tutorial for A Simple First Terrain.
- These processes can take a long time, and use a lot of memory and hard drive space. For a full-resolution (32k x 32k) MegaTexture, you will need at least 18gb of free space on the drive ETQW is installed to.
- Make sure all your paths are set up correctly, otherwise files may be missing.
The processes
MegaGen
MegaGen is the first stage of making a MegaTexture. It scans your .sft file for textures and then renders them all to flat "tiles", 4096x4096 pixels across. Each tile comes in two parts, a "diffuse" tile (contains un-lit surface color), and a "local normal" tile (for the bump and directional information).
These tiles will be outputted to your /maps folder, in the format <span style="padding: 0 0.5ex; background: #def;" title="A file or folder named '<mapname>_d_0_0.tga'"><mapname>_d_0_0.tga, and <span style="padding: 0 0.5ex; background: #def;" title="A file or folder named '<mapname>_local_0_0.tga'"><mapname>_local_0_0.tga.
Click on the "MegaGen Options >>" button to expand the option list. The settings are fairly straightforward:
- Resolution - sets the width and height in pixels of your final MegaTexture. For ET:QW we used a ratio of 1 pixel to 1 game unit, so a terrain which is 32,768 units across would use a MegaTexture with a resolution of 32,768. You can choose smaller sizes for faster "preview" compiles, or for smaller terrain sizes.
- Video Memory - how much of your graphics card's memory the program is allowed to use. 128 is a good value for most modern graphics cards.
- Cache Memory - memory used for caching all of the source images and writing out the tiles. Give it as much as your computer will allow! For a computer with 2GB of RAM, 1536 is a good value here.
- Additional Options - this is for advanced users to choose specific settings. A more comprehensive guide can be found in the MegaGen article.
RenderLight
RenderLight bakes atmospheric lighting information into your MegaTexture. Depending on the settings used here, MakeMegaTexture will either output a 3-channel (RGB) or 4-channel (RGBA) MegaTexture. RenderLight reads in the "tiles" from the previous MegaGen stage, and calculates the lighting based on the terrain model, the bump maps, and your map's atmosphere. It will output tiles in the same manner as
For RenderLight to work correctly, first you need to create a .rlt file (RenderLight Template) containing various options. You can find out how to create a RenderLight Template by reading the RenderLight article.
Click on the "RenderLight Options >>" button to expand the option list. The settings are as follows:
- Bake lighting - when checked, this option will bake the atmospheric sunlight into the MegaTexture.
- Bake ambient - when checked, this option will bake the ambient atmospheric light into the MegaTexture.
- Leaving both Bake lighting and Bake ambient un-checked will produce a 4-channel MegaTexture, which is larger size on disk but contains more accurate surface bump information, and requires a different material setup to the default settings found in /materials/megatextures.mtr.
- Additional Options - this is for advanced users to choose specific settings. A more comprehensive guide can be found in the RenderLight article.
Make MegaTexture
MakeMegaTexture is the process which compiles the tiles output from the RenderLight process into a compressed .mega file.
Click on the "Make MegaTexture Options >>" to expand the option list. The settings are as follows:
- Best Quality - denotes using the best quality compression. You should usually leave this enabled.
- Luminance Error - controls the brightness compression quality, where lower amounts mean better quality but larger file sizes.
- Chrominance Error - controls the colour compression quality, where lower amounts mean better quality but larger file sizes.
- Alpha Error - controls the alpha compression quality, where lower amounts mean better quality but larger file sizes.
For our retail Megatextures, we used 3-channel output from RenderLight, with all the MakeMegaTexture Error settings at 1, for best quality.
If you are making a 4-channel MegaTexture, we would recommend the Error settings at around 20-30 for each value. Lower values might greatly increase the file size, while higher values might result in very blurred MegaTextures.
Run the processes
Once you have set up all of the options for your MegaTexture, you can set the processes running.
- Each process can be launched individually by clicking the "Run" button on the right of each section.
- The "Run Selected Tasks" button in the bottom right will launch all of the checked processes.
- If this is the first time you're compiling a MegaTexture, check all 3 boxes for MegaGen, RenderLight and MegaTexture.
- You can un-check any processes you don't want to run. For example if you want to re-compile some tiles from RenderLight with different compression settings, un-check MegaGen and RenderLight, leave Make MegaTexture checked, and then select "Run Selected Tasks".
- Alternately, you can just click the "Make MegaTexture" button in the MegaTexture field.

