Difference between revisions of "The Atlas Editor"
| Line 26: | Line 26: | ||
===The Grid=== | ===The Grid=== | ||
| − | The Atlas Editor uses a grid system for snapping the edges of textures and surfacetype areas. You can change the grid density by choosing one of the ''Units'' values in the ''Grid'' menu of the Atlas Editor, or by pressing the hotkeys | + | The Atlas Editor uses a grid system for snapping the edges of textures and surfacetype areas. You can change the grid density by choosing one of the ''Units'' values in the ''Grid'' menu of the Atlas Editor, or by pressing the hotkeys {{accelkey|1 }} - {{accelkey|6 }}, (smallest to largest grid sizes). The default grid size is 4 units; setting this value higher will result in more obvious and easy snapping of large components. Setting this value lower will allow more precise editing, if needed. |
==Viewing== | ==Viewing== | ||
| Line 36: | Line 36: | ||
==Document Properties== | ==Document Properties== | ||
| − | Pressing | + | Pressing {{accelkey|ALT }}+{{accelkey|Enter }}, or clicking the [[Image:editsheets_icon_document_properties.png|Document]] icon will open the Document Properties in the Property Editor. |
[[Image:editsheets_document_properties.png|right|editSheets' Document Properties window]] | [[Image:editsheets_document_properties.png|right|editSheets' Document Properties window]] | ||
| Line 93: | Line 93: | ||
==Compiling== | ==Compiling== | ||
| − | When you want to bake your source maps down to a texturesheet, either choose ''Tools -> Compile'', press | + | When you want to bake your source maps down to a texturesheet, either choose ''Tools -> Compile'', press {{accelkey|F5 }}, or press the [[Image:editsheets_icon_compile_all.png|Compile]] icon. This will generate a full set of atlas textures and a matching surface type map, or remind you to choose a base name for your map if one is not already defined. |
| − | If you want to regenerate the surface types without overwriting the textures themselves, either choose ''Tools -> Compile SurfaceTypes'', press | + | If you want to regenerate the surface types without overwriting the textures themselves, either choose ''Tools -> Compile SurfaceTypes'', press {{accelkey|CTRL }}+{{accelkey|F5 }}, or press the [[Image:editsheets_icon_compile_surfacetypes.png|Compile SurfaceTypes]] icon. |
If your atlas map's base name is "texturesheets/example", a compile with default settings will produce the following files: | If your atlas map's base name is "texturesheets/example", a compile with default settings will produce the following files: | ||
Revision as of 11:09, 7 November 2007
The Atlas Editor (editSheets) is used to group multiple source textures together into one larger texture, known as a texture sheet. This texture sheet can then be used for multiple models, allowing them to share a single large texture and reducing the overall number of batches sent to the graphics card.
The Atlas Editor solves the problem of having to manually update the atlas map whenever one of its source maps is changed. A recompile of the atlas map is all that is necessary to incorporate any source map changes. It also lets you draw out areas of specific surface types, and automatically outputs these areas for the game to load.
Contents
Overview
The Atlas Editor can be started from the console with the editSheets command. The atlas source used to compile the atlas map is stored as a .atlas file in the folder base/atlas.
Terms
- Atlas Map - This is the large texture sheet that is a combination of several smaller textures, known as
- Source Maps - Tiling textures that are generally used on brush-based world geometry.
- SurfaceType Map - This is a way to specify material types within a texture. These allow for more accurate vehicle physics, sound and particle effects.
Using The Atlas Editor
Most of the commands are available in the menu along with shortcut keys. The mouse interface is as follows:
Editing
- Left-click/drag - Move the current selection around the grid.
- Shift-left click - Select the item currently under the cursor.
- Alt-left click/drag - Marquee-select points.
- Ctrl-left click/drag - Slice any shapes that the slice line crosses. This only affects Surface Type areas; images will not be affected.
- Enter - Creates a new image source. Also available by pressing the
 icon.
icon. - Ctrl+Enter - Creates a new Surface Type area. Also available by pressing the
 icon.
icon.
The Grid
The Atlas Editor uses a grid system for snapping the edges of textures and surfacetype areas. You can change the grid density by choosing one of the Units values in the Grid menu of the Atlas Editor, or by pressing the hotkeys 1 - 6 , (smallest to largest grid sizes). The default grid size is 4 units; setting this value higher will result in more obvious and easy snapping of large components. Setting this value lower will allow more precise editing, if needed.
Viewing
- Right click/drag - Pan the image around within the viewport.
- Mouse wheel up/down - Zoom in and out.
Preferences
- Selecting Edit -> Preferences will bring up the option to Close Engine on Exit. If left un-checked, this can be useful to go back to the game once you have finished editing your texture sheets.
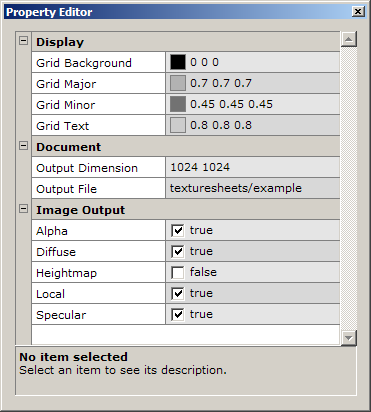
Document Properties
Pressing ALT +Enter , or clicking the ![]() icon will open the Document Properties in the Property Editor.
icon will open the Document Properties in the Property Editor.
Display
- Grid Background - The background colour of the texturesheet preview window.
- Grid Major - The colour of major grid lines in the preview window.
- Grid Minor - The colour of minor grid lines in the preview window.
- Grid Text - The colour of text displayed in the preview window.
Document
- Output Dimension - The horizontal and vertical size in pixels of the texturesheet (defaults to 1024x1024).
- Output File - The base name of the texturesheet and surfaceType map.
Image Output
- Alpha - Outputs an alpha channel with your texturesheet's diffuse map. This is on by default, remember to disable it if your texturesheet doesn't require any transparency, otherwise your texturesheet will use more memory in game than necessary.
- Diffuse - Outputs a diffuse map to the path specified in the Output File field, with appended _d.tga.
- Heightmap - Outputs a height map to the path specified in the Output File field, with appended _h.tga.
- Local - Outputs a local normal map to the path specified in the Output File field, with appended _local.tga.
- Specular - Outputs a specular map to the path specified in the Output File field, with appended _s.tga.
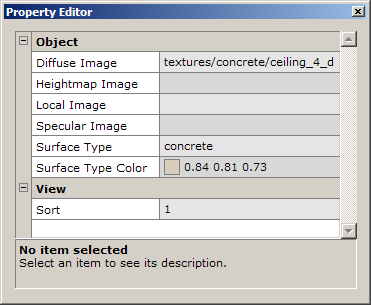
Image Properties
Selecting an Image rectangle in the preview window will bring up the Image Properties for the selected texture.
Object
- Diffuse Image - Path to the diffuse source texture, relative to the game's base path. Alpha channels in the diffuse texture will be honoured if the "Alpha" image output type is enabled in Document Properties (see above).
- Heightmap Image - Path to a heightmap source texture, relative to the game's base path.
- Local Image - Path to a local normal-map source texture, relative to the game's base path.
- Specular Image - Path to a specular source texture, relative to the game's base path.
- Surface Type - This determines the particles, sound and physics effects produced when things in the game collide with this surface. You can find a full list of valid Surface Types here.
- Surface Type Color - The colour tint of particles produced when colliding with this surface. This will only be used if the particle effects are set up in such a way that allows tinting.
Notes
- File type extensions can be specified, but are not required. References to textures/concrete01_d and textures/concrete01_d.tga will both produce the same effect.
- The Atlas Editor will automatically look for heightmap, local and specular images that match the path provided in the Diffuse Image section. For example, if textures/concrete_d is specified, textures/concrete_h.tga, textures/concrete_local.tga and textures/concrete_s.tga will automatically be used if they exist, unless different textures are explicitly specified in each field.
View
- Sort - This value is used to determine where the selected item will draw. A texture with a sort of "1" will always draw on top of a texture with a sort of "0", if the textures overlap.
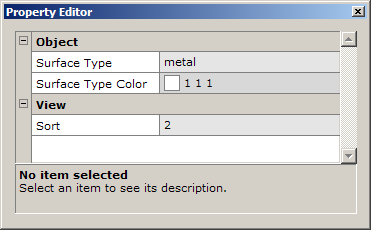
Surface Type Properties
Selecting a Surface Type area in the preview window will bring up the Surface Type Properties for the selected area.
Object
- Surface Type - This denotes the type of physics, sounds and particle effects produced when interacting with the surface in-game. You can find a full list of valid Surface Types here.
- Surface Type Color - The colour tint of particles produced when colliding with this surface. This will only be used if the particle effects are set up in such a way that allows tinting.
View
- Sort - This value is used to determine where the selected item will draw. A Surface Type with a sort of "1" will override a Surface Type with a sort of "0", if their areas overlap.
Compiling
When you want to bake your source maps down to a texturesheet, either choose Tools -> Compile, press F5 , or press the ![]() icon. This will generate a full set of atlas textures and a matching surface type map, or remind you to choose a base name for your map if one is not already defined.
icon. This will generate a full set of atlas textures and a matching surface type map, or remind you to choose a base name for your map if one is not already defined.
If you want to regenerate the surface types without overwriting the textures themselves, either choose Tools -> Compile SurfaceTypes, press CTRL +F5 , or press the ![]() icon.
icon.
If your atlas map's base name is "texturesheets/example", a compile with default settings will produce the following files:
base/texturesheets/example_d.tga
base/texturesheets/example_local.tga
base/texturesheets/example_s.tga
base/surfacetypes/texturesheets/example.stm
To use this sample atlas map you would create the following material:
material textures/example
{
	surfaceTypeMap "texturesheets/example"
	diffusemap	texturesheets/example_d.tga
	bumpmap		texturesheets/example_local.tga
	specularmap	texturesheets/example_s.tga
}


